The perfect place for crafty moms, people just starting out with their Cricut, looking for crafty idea, or for those who want to get inspired by a new idea. I am a Close to My Heart Consultant so I will also post projects that can be recreated with CTMH products!
Here's another simple card created with one of our CTMH Workshop on the Go kits. Unfortunately I created this before finding out that this Lucy Workshop has been discontinued, but I am including similar items for you to look at and if you already have the Lucy kit, you are good to go!
For this card, I relied heavily on the Cricut Art Philosophy cartridge. I started by cutting the flat card components and assembling them. I cut the flower shaped card base from Colonial White paper at 5 1/4". Next I used the Grey Woolx paper to create the circle, cut at 4 1/2". Finally, I cut 2 ruffled semi circles on page 69 at 1 3/4" using 2 of the duos patterned papers. When I was finished cutting these elements, I sponged the edges using the Round Sponge and the Olive Exclusive Ink. I used adhesive tape to put them together and then started on the dimensional elements. I used the Cotton Candy paper to cut the scalloped piece with a punch because I had already put my Cricut away, but you could definitely use the Cricut to make a similar shape for that component. I used the Lucy Compliments Glittery Rub On Sheets to add the cute little butterfly. These are no longer available, but there is a great Christmas themed set that will be fabulous for holiday cards! Be sure to go over the image you are adding a few times with the stick provided. This will ensure that the entire image transfers properly. Next, I added a few bitty crystal embellishments to the butterfly for a little "glitter." it also makes the butterfly look like it's flying. For the rectangle, I cut the Creme Brûlée paper to 2 1/2" x 2" and then stamped it with Olive Exclusive Ink. I used the stamp set that came with the Lucy kit. The quote is one stamp and the butterfly is another. I turned the stamp upside down to do the one on the top. I sponged the edges of these two elements with the Olive ink as well and then added the rectangle with 3D foam tape and used a smaller piece of that tape to add the pink scallop on top of that. When I finished the card, I felt like it was missing something, so I used some pink ribbon to create a little bow and attached it using my fave adhesive, Liquid Glass. I hope the past few posts have shown you that the Workshop On The Go Kits are very flexible and can be used to create not only scrapbook layouts, but also cards as well!
Since this kit is no longer available, I encourage you to check out some of the other NEW kits, including:
- Scholastic Kit - Great for back to school
- Flirty Kit - fun and flowery
- Scroll Album Kit - a great project
- Pear and Partridge - Christmas themed kit
- Moonlight Kit - Halloween themed
- La Belle Vie - Love themed kit
Also be sure to check out the 2 new card making kits just for people like me!! Avonlea and Partridge and Pear
Happy Monday!! I decided it would be fun to keep going with my Workshops on the Go projects to give you an idea of all of the fun projects you can make with these kits. They all include the Close to My Heart Duos papers, plain papers a stamp set AND some sort of embellishment. When you by the kit all together, it ends up saving you some money and ensures all of the components look BEAUTIFUL together!
For this post, I have created a beach inspired card using the CTMHWorkshops On the Go Footloose Kit. All of the papers are beach themed and the stamp set includes a starfish, seahorse, sand dollar, shell and fish! If you love to scrapbook, this is a great kit for putting together stunning layouts for beach vacations or just awesome days at the shore.
To create this card, I started with a white 4"x6" card. I cut my cardstock to 8" x 6" and scored it at 4" to create this base. On top of that, I added the pale green "Sweet Leaf" stock, cut to 3 1/2" x 5 1/2". For the next layer, I added three separate pieces of card stock on top of the green stock. The larger piece on the left is 2 1/2" x 3" and the two on the right are 2 1/2" x 1 1/2" each.
After I finished the flat card components, I created the three layer scalloped circle embellishment. The bottom peach "Creme Brulee" scalloped layer was cut using the Cricut Art Philosophy cartridge. I cut <circle2> on page 31 at 2 1/2". On top of that, I glued <circle1> on page 21 cut at 2". I cut another <circle1> to 1 1/2" and stamped it in Lagoon Exclusive Ink with the "Happy as a Clam" stamp (which is empty in the middle of the circle) and then added the "clam" stamp in the middle. I used 3D Foam tape to add it on top of the blue, "Lagoon" circle. Finally, I used the Lagoon ink to stamp the sand dollar onto one of the Wooden Badge Button embellishments. The come with an adhesive strip on the back, so it was easy to add to the scalloped circle.
If you noticed that the layers stand out nicely against one another, that is because, before I started, I used the Round Sponge to sponge the edges of the card, and all of my other layers with Cocoa Exclusive Ink. This adds dimension to the card and looks awesome!
I hope you enjoyed this card and will try it yourself. Have a great week!! XO -Jamie Glitter Panda
I had to go to my undergraduate university today to get an application for a professional certification program. As I approached the office door shortly past 11:00, after being redirected to the appropriate one 3 times, I saw the sign that proclaimed they would be back at 1:00. I left the building and sat on a bench in the quad I spent so many moments in a hundred years ago.
The wait inspired me to create this lesson. I think I will use it for my Freshmen this coming school year. I hope it inspires you too.
A moment of inspiration - a lesson in imagery
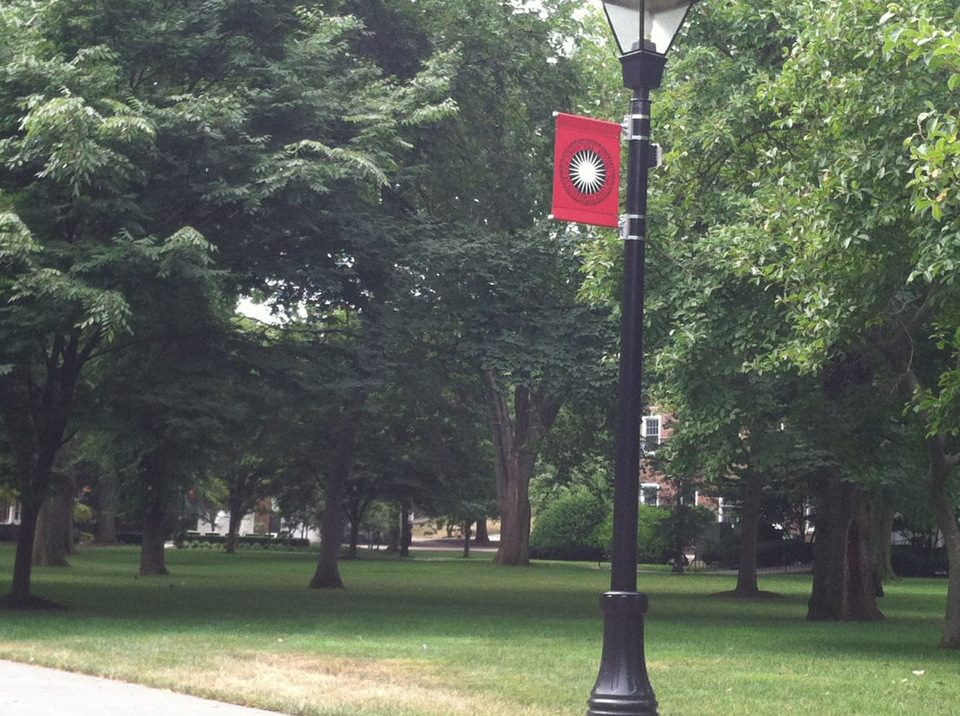
Stop where you are. Sit down. Take a moment to view your surroundings from that perspective. Take a picture of the angle that catches your attention. Write one paragraph describing the sensory experience in that moment.
(Sight) The trees formed a canopy over the quad that reached from one end to the other. Shaded areas looked inviting, almost begging for a picnic lunch to be enjoyed on the soft carpet of lush green grass. The vibrant scarlet, black and white University flag stood out against the deep green background as a symbol of education tucked into the natural landscape. (Smell) The air was clean, untouched by the scents that would soon rise from the grease trucks to blend in a symphony of salt-pepper-ketchup as the students here for summer classes grabbed a quick bite on their way to, or from, their last, or next, class. (Taste) The air carried the tang of summer into my mouth as I inhaled and the taste of the Lush Bubblegum Lip Scrub left sweet remnants behind that made the experience even sweeter. (Touch) Slowly, the heat of the late morning sun pressed on my soft black yoga pants with intensity as though asking why I insisted on wearing black on such a sunny day. (Sound) For a brief moment, only silence intermingled with birds chirping, until the sounds of classes letting out brought passersby, hints of their diverse conversations lingering even after they'd walked past. (Memory/connection) My mind's eye saw the surroundings as they were when I was here. In my memory, some students rushed to classes, while others took in the sun on towels their parents had lovingly selected with them at Bed Bath and Beyond a few weeks before the semester started. The strong sensory experience, paired with the ghostly memories provided the perfect moment of reflection. In that moment, I was a student, an educator, and a student once again.
It would be great to have more examples, so I hope you will take your own moment and share your paragraph (or even sentences) with me!
Good Morning!! I'm so happy to be guest blogging for Cricut is Close to my Heart again today. I hope everyone had a wonderful Fourth of July!
Today, I have a card I created using the CTMH Workshops On the Go Pemberley Kit.
This was something I had my eye on for awhile before I decided I HAD to
have it. The cool blues and yellows in this pack complement each other
beautifully, and I love the big flowers and the sweet embellishments it
comes with.
The card base for this project is Outdoor Denim card stock and was cut at 6" x 12" and scored at 6" to create a 6" x 6" square card. The next square layer is Desert Sand card stock and was cut to 5 3/4" x 5 3/4". I attached this layer using dimensionals to give the card a little pop.
Then, I attached the scalloped rectangle. This was created using the <Rctngle2> button on the Cricut Art Philosophy cartridge
cut at 4 1/4". You can find this cut on page 54. I attached the smaller
3 3/4" x 3 3/4" square on top of that. This was cut from one of the
Pemberley duos papers. Both of these elements were added using the Bonding memories broad tip glue pen.
Cut the left side off the rectangle to keep it from showing from behind the square
Next, I added the vertical blue strip cut from Pacifica card stock at 2" x 6". Over this, I added a 4" <Circle1> cut from Art Philosophy.
This image is on page 21of the booklet. The circle was added using
dimensionals as well. I sponged the edges of the circle with the Olive Exclusive Ink Stamp Pad using the round sponge.
Finally, I used the dimensionals to add the big flower that I cut from the Pemberley duos paper using the fabulous micro-tip scissors. I also sponged the flower with the olive ink. I finished the card with bitty opaque pearl adhesive gems for a pretty touch.
You can see the added dimension from this angle...and the cute bitty pearls
The Pemberley Workshop on the Go
Kit contains all of the paper and embellishments you will need to
complete this project! I hope you like the card and that you'll try to
make one on your own!!
Hello
again! I am guest blogging on Cricut is Close to My Heart today!! Here is my post: I hope everyone had a wonderful Father's
Day...I know we sure did. Today, I want to share the card I made for my
wonderful father and my amazing husband. I was inspired by the 7" x 5" R
Card artwork on the back of the Dotty for You paper pack. I found this
card to be quite versatile, and I was able to make just a few changes to
make it masculine instead of feminine.
I started with a
7" x 5" card base for both cards. One in Kraft and the other in yellow.
For both cards I added the big dot paper as the background. This took
the place of the butterfly paper from the back of the paper pack. I cut
this later at 4" x 6" so it wouldn't show from behind the frame layer I
added next. I cut the frames using the Cricut Art Philosophy cartridge
<Rctngle1> image at 4". For the Kraft frame, I used the mini
yellow polka dot paper and for the Yellow frame, I used the blue mini
polka dot paper. Both the big dot layer and the mini dot layer were
added with dimensionals to give the card a fun twist.
Before
I added the frame layer, I turned it over and added some green ribbon
to it so it would show though. I used my trusty liquid glass adhesive to
secure it to the back and put the adhesive on the back of the frame so
it wouldn't show. Then I added the dimensionals and attached the frame.
Finally, I used my Cricut Wild Card cartridge to cut the Happy Father's
Day sentiment at 9 1/2". That is the <father> image on page 66.
Both my father and my husband loved the cards and I hope you do too!!
See you soon!
Hi there and happy Sunday! I am so excited to be back as a guest blogger over at the Cricut is Close to My Heart Blog! Since I went
complicated the last time I was there, I thought it would be appropriate
to go super simple this time. Our very close family friend just
graduated from Nursing school after a long program to go from an LPN to
an RN. She has worked tirelessly and we are all so proud of her.
I
wanted to create a pretty card that was also simple. I also wanted the
sentiment to include the idea that she is going on to receive her
Bachelor's of Science in Nursing as well. I thought that a Best Wishes
ard would say everything there is to say. That considered, I have also
been so excited to use my Dotty for You papers! I went super simple by forgoing my usual Cricut cuts and just using my trusty paper cutter and some mono adhesive.
Here's the recipe if you'd like to try this simple card:
Front of Card:
Card base - 5" x 10" scored at 5"
2nd layer - 4 3/4" x 4 3/4"
Top layer - 4 1/2" x 4 1/2"
Polka dot band - 4 1/2" x 1 1/4"
Stamped band - 4 1/2" x 1"
I stamped the band in Lagoon ink
Inside Card:
2nd layer - 4 1/2" x 4 1/2"
Top Layer - 4" x 4"
Make sure you use a light color for your top layer inside to write on!!
I feel as though I have been away from my blog forever! It has been crazy here at the Panda household, but things are finally getting back to normal. As I have said before, I am a teacher, and I am also the yearbook adviser. I was working on a very difficult end of year yearbook deadline and couldn't stop to "smell the roses" for even a moment. When I finally finished that, my body decided it would be a fabulous time to get very sick for a little while. This past week, I finally started feeling better but had to finish preparing for Cubby's basketball birthday bash! We had the party today and it was a blast. The kids had a great time and Cubby loved it!! I will post pics of the party favors shortly because they were too cute not to share. I know I missed a couple of holiday card posts as well, so you can be sure that as soon as I can create them, I will share them!! Have a wonderful week and talk to you soon!!
BIG Panda Hugs!
J-
Glitter Panda
Today is not the type of day to commemorate with a card. Rather, it is a day to think. To think about what happens when we forget that the person next to you is often similar to you on the inside, even if he or she does not look or sound entirely like you. It is a day to remember what can happen when one person is able to influence others to treat a person or group of people as though they are inferior. It is a day to remember to celebrate our differences, rather than vilifying them. Take a moment today to think about something positive to say, the next time you notice a difference. Think about how much better the world would be if we all did that, every day.
"Those who cannot remember the past are condemned to repeat it" ~George Santayana
Hi there everyone! This is Jamie, more affectionately known as Glitter Panda.
I have a beautiful card to share with you today AND an awesome giveaway
at the end of this post. Mother's day is right around the corner and I
am fortunate enough to have MANY fabulous mommies who I love dearly. So,
I realized I am going to have to start nice and early with my Mother's
Day cards to make sure I have enough. I am sharing my very FIRST
Mother's Day card with you today. Today's card is what I call the
Four-Frame Shadowbox Card. I LOVE shadowbox cards and when I found this
four-framed square on the Art Philosophy cartridge I knew I had to try
it out!! To make today's card, I used the Cricut Art Philosophy cartridge for every cut! I also used the new Stella 12 x 12 paper packet.
To
create the card, I started with a 5" rounded edge square card (SQUARE1
cut on the card button) on page 23 of the Art Philosophy booklet. I
sponged the edges of the card using the CTMH Olive Exclusive Ink Stamp Pad and Round Sponge.
Next,
I added the 5" four square frame on top of the card base (SQUARE1 on p.
23 on the decorative layer button). I used dimensionals to do this.
This creates a 3D effect and raises the "shadowbox" a little bit higher.
I used the same ink to sponge the edges of this layer as well.
I
like to put something different in each frame. On the top left, I used a
2" butterfly (BTTRFLY2 p. 55 cut on the regular button on shift for the
bright blue base and the Layer button on shift for the pretty,
decorative overlay. I edged only the base with the olive ink because the
overlay is too delicate. I attached the overlay to the base using liquid glass
only on the body of the butterfly. This allows the overlay to pop up as
long as you gently roll the edges up. I added 3 tiny pearls to the body
of the butterfly and then I added this to the card using two layers of
dimensionals so it looks like it is about to fly off the card!
The
bottom left square is where I added the sentiment. I used a 1 1/2"
square shape with the corners cut out (SQUARE5 on p.63 for the base cut
and then the same cut on the decorative layer button for the frame). I
mounted the bright blue paper to one of the Dimensional Elements Mixed Shapes
that matched. These are chipboard shapes and this set specifically
coordinates with the cuts on the Art Philosophy cartridge if you cut
them on the suggested size. I stamped the square with the Love sentiment
using the CTMH Olive Exclusive Ink Stamp Pad.
Finally,
the bottom right square is a 3D Rosette. I LOVE these!! I created a tutorial to help you use the Art Philosophy cuts to create the Rosettes and embellish them. For this particular Rosette, I used a
double layered approach by cutting two rosette shapes at 3" on the
Cricut (p.68 on font layer in red and orange). First I inked the edges
in Olive, then I put them one on top of the other and staggered one
slightly higher than the other. Finally, I rolled them up together and
secured them with liquid glass. I added a clear jewel in the middle for a
little bling! I put one of the canvas shape stickers down first to
become a leaf for the rosette and to add a little more dimension.
I
am so happy with the way this card came out, and all of the cuts were
made on ONE cartridge. I love the way the papers in the Stella paper
pack complement each other. it made it VERY easy to come up with a great
color combo!! I hope you enjoy recreating this card as much as I
enjoyed creating it in the first place.
Last, but not least, I have a CONTEST for you!! As a SPECIAL treat, Vicky from Good wil* Creations
has generously donated a one-of-a-kind twirl skirt of your choice to
one lucky person. You can even choose whether you want the child or
adult skirt child! These adorable skirts are made using recycled
t-shirts, so they are even good for the environment!! To be eligible to
win, just sign up for our new Close to My Heart monthly newsletter! Click here for the link to register,
and please feel free to shop at my Close to My Heart store today! I
will announce the winner of the skirt on my blog next Sunday, April 22.
Good Luck!
Panda Hugs!
J-
Glitter Panda
I am entering this card into the following challenges:
It has been a VERY long week, but it has been a lot of fun. Between being off for spring break and all the holiday celebrating, it will be hard to get back into the swing of things. This week, however, I am so excited about my guest designing spot on Use It Tuesday! The Anything Goes challenge is definitely a a favorite of mine. At first I thought it would be fitting to create something that reflects who I am as a crafter and I think I hit it right on the head with this Glitter Panda shaker easel card. I have been holding on to this adorable panda stamp for quite some time and this seemed like the perfect chance. I dipped into my extensive stash of paper for this one and then used my pearls, glitter and ribbon too. I even created the flower using a punch instead of my go to Cricut cartridges. Then, I needed to make an Easter card for my mother-in-law and fell in love with that one! So, I decided to post the Easter card on Use it Tuesday and here it is:
There are a few techniques I want to explain with this one, so I will create another post to explain how I made it, but wanted to include it here today :)
Although we are busy getting ready with last minute preparations for Passover, I couldn't let the holiday go by without a card to share! My sister in law brought my shamrock easel card to Ireland and said it was a hit, AND they used it as the centerpiece on the table for St. Patrick's day, so this time, I made an easel card so we can use it for decoration on the table too! Needless to say, the Passover images are few and far between on my Cricut cartridges, so I used the "Passover" sentiment from Designer's Calendar and the Star of David from the same cartridge. The card base is an easel and I used my shaker card method to put the star in the background with the blue glitter my son, Cubby, picked out. The two rosettes are from the Cricut Art Philosophy cartridge and the method for creating them can be found here.
With March Madness coming to a close, there is no better time to create a basketball card! My son was at a basketball clinic all day today and then came home for 30 minutes and turned around to go to basketball practice! So you can imagine basketball is pretty big around here. One of my son's travel team teammates is having a birthday party party this week, so I decided to create this basketball birthday card. I specifically chose the black and white striped paper reminded me of a referees uniform! It is so much more masculine than the cards I usually make, so I am proud of myself for going outside my comfort zone!
To create the card, I used the Cricut Art Philosophy cartridge for the banner and the border. The basketball is from two of the layers on the basketball image on the Cricut Best of 2008 cartridge. Here is a side view so you can see that the banner is added with 3D Foam Tape. I ran the orange ball through the Cuttlebug with the Swiss Dots folder to make the texture more basketball-like. I sponged the edges of all of the layers and embellishments. I used the Close to my Heart "Celebrate" stamp for the first time and used Cocoa ink for the softer color. The little metal basketball is a brad I have been holding on to for a while. I thought that added just the right finishing touch!
Bye bye for now...Panda Hugs!
J-
Glitter Panda
I am entering this card into the following challenges:
Use it Tuesday Challenge #28 - Uninked Stamp - I used the Celebrate stamp that came with my CTMH Cricut collection (I also used the basketball brad I've been hoarding, the striped Recollections paper I have had but never used and my go to plain card stock that is taking over my dining room!)
Getting people to read can be a challenge. I know this because I am a high
school English teacher. When I ask, at the beginning of the year, how many of
my students read for pleasure, I am often met with the sound of crickets and a
lonely hand waving frantically to share the last 16 books that he or she has
read. Because of this, I am compelled to weigh in on the current debate going
on about the 50 Shades of Grey series by
E.L. James.
Although my opinion does not matter much, for purposes of this post, I will
say that I truly enjoyed this series. Is it award-winning literature? No. Is it
highbrow literary eloquence? No. Is it even without errors that could have been
caught with additional editing? No. However, it IS a fun, quirky look at ONE
couple's experience in the world of BDSM. When I emphasize the "one,"
I do this for a very specific reason. Apparently (as I do not have practical
experience to rely on), not EVERYONE into this lifestyle practices it this way,
just like not EVERYONE into this lifestyle will enjoy this book.
For those of you who are appalled that a mom from the suburbs is reading
such things, I appreciate, but politely disagree with your opinion. I am open
to all forms of literature. I find that after lauding the classics for their
merit all day long, sometimes I want to come home and stop thinking, stop
analyzing and stop working. I am happy to fall into an alternate world,
whether it comes in the form of vampires, witches and werewolves, sex crazed
BDSM practitioners or even just regular vanilla characters involved in a story
I enjoy. I don't care if the book I am reading accurately portrays the
lifestyle it professes to be about or contains anachronisms. I don't care because
I am trying to indulge in some mindless reading. During my mindless reading, I
like to stop thinking and start experiencing.
Now I will step off my soapbox and explain what this post is REALLY about. I
have seen many articles, Facebook posts and tweets that rant and rave about how
"lame" this book is. People clearly have very strong opinions about
it. I understand the book critics who provide a book review because it is their
job, but for people to insult their friends online because of a book is wrong.
I teach my students not to judge a book we read in class until they have
completed it. Even then, I try to encourage them to come away with SOMETHING
positive they have gotten by reading it. Insulting the people who enjoy this
book kills the pleasure in pleasure reading. Don't murder the experience for
another person, especially if it was a good one. Although it is cliché, if you
don't have anything nice to say, be quiet, or private message your friends who
share your opinion, but don't insult someone for enjoying a book. It is a
personal experience.
As I said in the beginning, it is difficult to get people, of all ages, to
read. I have friends who infrequently or never pick up a book. This book, like
the Twilight series that it is loosely
based on, has gotten "mommies" and other women (and men) READING. In
my opinion, whether you like the book or not, isn't THAT the point?
You may be wondering my blog is written in blue today. Here is my explanation: When I set out to create a card for every holiday, I thought about the fact that there are many little awareness days throughout the course of the year. Although I can't create a card for EVERY one of them, some are so important, I just can't pass them up. Today is one of those days.
Today is World Autism Awareness day. According to the Autism Speaks website, "the Centers for Disease Control and Prevention (CDC) updated its estimate
of autism prevalence in the United States to 1 in 88 children (1 in 54
boys and 1 in 252 girls)." Look at the number of friends you have on facebook. I have 370. 1 in 88 would touch at least 4 of my friends. When I think about the number of their friends and family, those numbers increase exponentially. Today, chances are either you, or someone close to you is personally affected by autism.
As a special education teacher, I have taught many autistic children. They are all unique in their own ways. One student I taught for two years is exceptionally funny. He has channeled his sense of humor into some of the best screenplay writing I have seen by a teenager. One student just participated in the school musical and I had never seen her look so happy! So as you go about your business today, take a moment to consider that the more we are aware of something, the more we can do to help.
You can join me, and Autism Speaks in celebrating World Autism Awareness Day by taking part in their "Light It Up Blue" campaign "to help shine a light on autism." Use blue to light up something on the outside of your house, wear blue, anything you can do to "light it up blue." You wouldn't believe how many people and organizations have joined in the campaign today! The Empire State Building, Paris Stock Exchange, CN Tower and MY BLOG are just some of the few. Visit the Autism Speaks Light it Up Blue campaign page to see even more.
Recipe:
Card Base
Plain piece of card stock - Cut 8" x 6" and score at 4" to make 4" x 6" card.
Cricut Art Philsophy cartridge - RCTNGLE1 p. 44 - white cut at 3 1/2" & blue striped paper from the DCWV Sweet Stack cut at 3"
Sponged the edges of all layers and embellishments with Tim Holtz Tea Dye Distress Ink
side view shows dimension
Embellishments
Big pink sunburst cut from Cricut Art Philsophy cartridge - FLOWER2 (shift button for SHAPE5) p.66 at 4" was added first with 3D Foam Tape
Next, I added the long peach patterned frame from the DCWV Sweet Stack - cut from Cricut Art Philsophy cartridge - SHAPE4 p. 56 cut at 1 1/2" - I added a twine-like yarn that I got for $1 at the craft store and taped it underneath the paper and then added the layer with more 3D Foam Tape
The top Doily-like flower was added next. It was cut from Cricut Art Philsophy cartridge - CIRCLE3 p.41 at 2 1/2" on the regular button for the peach patterned flower shape from the DCWV Sweet Stack and the layer button for the lt. pink doily shape
I added tiny adhesive pearls to all of the holes in the doily
Then I used a dimensional to add the puzzle piece with the word "Speak" printed on it - I made this on my computer from a free puzzle digital stamp image file from Aimee Asher. I layered the word on it in my word processing software and printed it on blue card stock - then I used my micro scissors to cut it out
I am entering this card into the following challenges:
Even though I love my job as a teacher, I always feel like the little break we get, at this time of year, allows us to stay fresh and enthusiastic for our students. Teachers, not unlike many other professions, always have to be "on." Whether we are having a bad day, just received awful news or simply are not feeling "well," we can not let these emotions or feelings interfere with our classrooms. From 8:00 - 3:00, every day, we put on our smiley faces and let the kids know that there is a friendly ear waiting to hear all that interests them, a patient person to help them deal with all that troubles them, and a knowledgeable guide to point them in the direction of any assistance that they need.
So, it is understandable that since we have to keep smiling, even in the face of difficult situations, we have the occasional need for a moment to ourselves. One to enjoy our families, take care of our health problems and just re-energize for the rest of the year. Spring break is a wonderful time to do this. Not only because it comes after a long period without a break from school, but also because it is a time to celebrate the spring holidays, like Easter and Passover.
Although we do not celebrate it personally, we always participate in the Easter activities in our community. The revelry of the Easter bunny and Easter egg hunts have become family, rather than religious activities. Today, we have our 2nd Annual Easter Egg Hunt Block Party. All of the children on the block get together to hunt for eggs, win prizes and eat the awesome food made by the wonderful parents on our block! To celebrate the occasion, I made this VERY simple Easter card. I hope you enjoy it!
Panda Hugs!
J-
Glitter Panda
Recipe:
Cricut Art Philosophy cartridge (from Close to my Heart) - Cut the egg card base Shape9 on card button (pg. 57) at 5" - you can use any patterned paper for this - I used a very tie-dye looking paper from my SEI Couture Stack
Cut the Shape9 on decorative layer button (pg. 57) at 5" - This looks better with a solid color that you pick from the patterned paper - I added this layer using dimensionals to give it a layered look
My daughter's Kindergarten teacher has been amazing! She is supportive, thoughtful and the kids absolutely adore her. So, you can imagine how sad I was when she explained at conferences, that Friday will be her last day. Her reasons for leaving are family related and absolutely justifiable. If I were in her shoes I would have to do exactly the same thing. This does not, however, take the sadness factor out of the equation. They have asked her to wait to tell the children, so there is this black cloud hanging over us, knowing that very soon, our daughter will be devastated! For all that she has done for my daughter this year, I wanted to make sure Bunny will give her a card that is super special.
So, I decided to experiment with my Art Philosophy cartridge and come up with something unique. Since getting the cartridge, I have been eying the little window card I used here. BUT I wanted to jazz it up a little more, so I decided to make a shaker card out of it! Using the same button for the card base, window and layer, I was able to come up with the perfect card. To put a finishing touch on it, I also added one of the fabulous rosettes I made for my tutorial video. You can find that video here.
As an extra bonus, I am including a second shaker card here and a tutorial on how you can create it too! It doesn't use the Cricut, so it could be recreated by any crafter, even a Cricut-less crafter! I hope you enjoy it!
I am having so much fun with my Cricut Art Philosophy cartridge!! I was having trouble finding videos to help me figure out how to assemble the Rosettes on pages 68-70, so I decided to make my own!! This is my first full-length tutorial video, so it is far from perfect, but I hope it will help you to figure out how to create beautiful rosettes for your projects. I am looking forward to creating some cards that include these!
I am so excited to get started with all of my fabulous Close to My Heart products! I am in the process of getting together a group for a crafting workshop and am thinking about the Sweet Surprises Card kit to get everyone started AND excited! This was one of the first products that caught my attention. The cards come in a set of 10 and are perfect for creating birthday cards or Valentines, but imagine how great it would be to use as a good bag/thank you for a birthday party! Today, people are looking for ways to get the thank yous out as soon as possible. Imagine having these ready to go with a note thanking your guests for coming! Check out the video below, and if you are interested in purchasing the kit, CLICK HERE to order now!
You can NOT imagine how excited I was when my Close to My Heart Consultant Kit arrived on Friday with my very own Cricut Art Philosophy cartridge and collection! We had a busy weekend planned and all I wanted to do was start crafting!!! BUT...first things always come first and I was only able to find the time to make one card so far. My daughter had a birthday party yesterday, and I could not resist the opportunity to make a princess card for the princess themed party. I had very little time, so I wet super simple, but I was so delighted by how easy this new cartridge made it for me to make a birthday card in less than 15 minutes (which was all the time I could spare after gymnastics and a shopping trip to buy a gift!). Since I am so happy with the cartridge and since you still have time to get it for FREE when you sign up to be a Close to My Heart Consultant for just $99 in the month of March, I wanted to give you details ASAP!!
What do I have to do? Sign up to be a consultant with Close to my Heart and get, not only
the amazing start up kit, but also your choice of the Cricut Art
Philosophy Collection or $100.00 in free product for only $99.00. It is included with the crafting packed starter kit! It is important to note that if you want this cartridge, signing up for CTMH this month will give you tons of free extras and you never have to sell a thing!!
Embrace the Philosophy of fun with the Cricut Art Philosophy Cartridge
Not sure if this is the right option for you? Here are some of the most frequently asked questions about this amazing opportunity...
What is the Cricut Art Philosophy Collection?This collection includes the Cricut Art
Philosophy Cartridge. It is AMAZING!! With over 700 images, you will be able to create fabulous cards, envelope liners, boxes, a door hanger and more! In addition to the cartridge, you get 3 full sized
coordinating stamp sets that include cut sizes on the stamps to get the
perfect cut to use with you Close to my Heart Stamp Images. You also
get 3 large sheets of chip board shapes that match the cuts on the
cartridge. They are ready to perfectly work with your stamps and inks.
This is a $124.00 value. CTMH's regular price is $99.99 for this
collection. You will get yours FREE in the month of March!
Here is a picture of the Collection so you can see some of the amazing stamps that are included:
Keep in mind that not
only does the Art Philosophy cartridge include shapes that were created
exclusively to coordinate with the included CTMH stamp sets, but CTMH indicates when stamps not included with the collection coordinate as well, so you can buy more stamps later to go with this amazing cartridge. This means that you can cut down on all of your dies and punches and replace them with this versatile cartridge!
What else will I get in my Consultant Kit? Your stater kit will include both business supplies AND lots and lots of the most popular CTMH products to get you started (or just to play with if you choose not to take advantage of the business opportunity)! You will receive MANY different stamps (of the very highest quality - check out the card I made at the top of the post...the Happy Birthday stamp is almost as crisp as a computer printed image!) inks,
acrylic blocks, embellishments, stamp spritz to clean the ink, the famous stamp double
scrubber, cards, envelopes, paper samples, idea books,
adhesives, liquid glass and more! The contents of the kit include products valued at $288.00 and you STILL only pay $99.00 INCLUDING the Art Philosophy Collection
FREE!!! Altogether, you will receive approximately $400.00 worth of high quality and super fun products for just $99.00!!!
Here is a picture of all the amazing items you will receive:
Are you interested in Digital scrapbooking?Add on a 3 month Studio J
Membership. This will allow you to create spectacular digital designs in the comfort of your own home! If you are into digital scrapbooking, this is a great
package. It's a $63.00 value and is yours for only $40.00 exclusively to "New"
consultants.
What's the best part? After you purchase your consultant kit, you are under no obligation to do anything other than enjoy it!! You are not under ANY pressure to become a CTMH consultant, but it can be so rewarding, so if you want to try, you could do that too!! You can sign up today, enjoy all of these amazing products and still not be obligated. You will have access to the CTMH online training academy to get ideas and inspiration. and you can learn more about this exciting business opportunity with no PRESSURE!! Finally, you will start off with a 22% discount on your future purchases and a 22% commission on all of your sales as well. AND as you buy and sell more, that number only INCREASES!!
What's the catch? What do I have to give back if I don't become a consultant? ABSOLUTELY NOTHING!!! If you never want to move forward as a consultant, the entire kit is yours to keep, including the fabulous Art Philosopy cartridge! If you continue with the business opportunity, you meed to have at least $300 in sales per quarter to keep your consultant status. That's only $300 in sales for every 3 months! We would love for you to go above and beyond this, but that is all that is required. So throw a crafting party once a month for 4 or 5 friends and you will MORE than cover the minimum!! If you do not reach $300 a quarter, you
become a Jr. Consultant. The commission is lower and you will not have
as much access to online areas, BUT you will not have any fees or penalties to pay. But don't worry, our blog and the blogs for other fab CTMH consultants will still continue to inspire you regularly!
I hope you have seen something (or a lot of things) that you like here. If you have, CLICK HERE to join me as a CTMH consultant today...OR if you just want to shop with me, I would very much appreciate it! Just CLICK HERE to shop with me now!
Happy St. Patrick's Day!! If you are celebrating, I hope your day is full of fun and excitement!! We're going green here to celebrate. Although the holiday is today, my card was actually ready last week and is now finding its home in IRELAND! I knew I was going to make a card to celebrate my Year of Holiday Cards, and always love when I have a fabulous use for my cards. This one was great because I sent it to my brother-in-law's family in Ireland!!
I don't have the recipe for this one because I had to make it in a hurry, but you can find the recipe for my easel cards here. I used the shaker card process as well for the top layer. This was nice and easy because I used tiny shamrock die cuts from the Cricut Designer's Calendar cartridge inside (all shamrocks on the card, including the cutout are the same cut at different sizes), so the foam tape could have small gaps without the filling falling out. For embellishment on the top card, I hand stitched the card with my white gel pen, and added green Recollections crystals. On the bottom card, I added rainbow ribbon with green glitter ribbon over it (both are taped down under the layer), and stamped it with my Studio G stamp that has a horseshoe with the words Luck O' the Irish all the way around.
Panda Hugs!
-J
I am entering this card into the following challenges:
Use it Tuesday Challenge #27 - Green! - (used my go to Recollections paper, my crystals from my stash, and Offray rainbow ribbon I have had for 100 years!)
I finally decided it is time to take my scrapping to the next level!! I am very excited to announce that I am now a Close to My Heart Consultant. I hope that you will take a moment to check out my snazzy new website. AND I would LOVE for you to join me in this new (ad)venture! Since many of you know I am obsessed with all things Cricut, you may be intrigued by the CTMH March promotion. For the month of March, when you sign up to be a CTMH Consultant, you get the Cricut Art Philosophy cartridge and stamping set FREE!!! There has never been a better time to join, so I hope you'll take a look at all there is to offer. I look forward to posting my first projects for you and am so happy you can join me as I embrace the culture of Close to My Heart!
Today was a spectacular day. The sun was shining, it reached 70 degrees and a hint of Spring hung in the air. It was one of those days, for me, when I just feel like a diva. I found myself walking around a local outdoor shopping center with a little more "spring" in my step. With my flowy dress, fab Gucci sunglasses (I splurge because they're prescription) and high heeled boots, I felt like a movie star! I went shopping and it was ALSO one of those days where I loved everything I tried on!
Thinking about my mood, I am convinced that is the combination of the two holidays today that did the trick. The first is Purim, a Jewish celebratory holiday that celebrates freedom from destruction for the Jews in ancient Persia. It is a day of feasting and partying and is often celebrated by dressing up in costume and giving charity to those less fortunate (kind of the opposite of Halloween, you dress up and leave charity at the door - the costume ensures that you remain anonymous). The heroine of the Purim story is Queen Esther. Esther was only allowed to see her husband, the king when he summoned her. The punishment for disobeying this command was death. However, she went against to decree in order to appeal to her husband King Ahasuerus. She asked him to spare the Jewish people from the plan an evil man named Haman had to persecute them. Her success saved the Jewish people, and for that, she is considered a brave, heroic woman. That brings me to the second holiday of the day, International Women's Day.
According to the International Women's Day Website, "International Women's Day has been observed since in the early 1900's, a time of great
expansion and turbulence in the industrialized world that saw booming population growth and the rise of
radical ideologies...IWD is now an official holiday in Afghanistan, Armenia, Azerbaijan,
Belarus, Burkina Faso, Cambodia, China (for women only), Cuba, Georgia,
Guinea-Bissau, Eritrea, Kazakhstan, Kyrgyzstan, Laos, Madagascar (for
women only), Moldova, Mongolia, Montenegro, Nepal (for women only),
Russia, Tajikistan, Turkmenistan, Uganda, Ukraine, Uzbekistan, Vietnam
and Zambia. The tradition sees men honouring their mothers, wives,
girlfriends, colleagues, etc with flowers and small gifts. In some
countries IWD has the equivalent status of Mother's Day where children
give small presents to their mothers and grandmothers." Hmmm...why haven't the men here caught on?!
So, in honor of these two holidays, I created a card in honor of Queen Esther, a brave, heroic historical figure who just happens to be honored on the same day as a holiday that celebrates women as a community! I made another easel card, but this time I used my Cricut Once Upon a Princess cartridge and some more of that fab SEI Couture stack too!
Hope you enjoyed my little "lesson" of the day, and the card. Happy crafting!
Panda Hugs!
J-
Glitter Panda
.JPG)
.JPG)

.JPG)

.jpg)
.jpg)
.JPG)
.JPG)
.JPG)
.JPG)
.JPG)
.JPG)
.JPG)
.JPG)

.JPG)
.JPG)
.JPG)


.JPG)
.JPG)


