Tweet About Me

Follow Me on Pinterest

Sunday, November 27, 2011

Cricut Wild Card Cartridge Review

Hello all! Sorry to have been away for so long, but with grades due at the end of the school marking period and Thanksgiving with the family, things around the house have been hectic.

Since it's been a while, today seems like an EXCELLENT day to start my new "Review Day" feature! From time to time, I will review something new and exciting that I have added to my crafting repertoire. You may have noticed that I LOVE the Cricut Wild Card cartridge. This is my current go to cartridge for all things card related.  I love that you do not have have to measure and cut to gt perfect cards every time.

My favorite cards on the cartridge are the "doily" and "pinwheel" cards. These are buttons 21 and 20 if you number your booklets starting at the first image.

Mixing and matching with the sentiments is very easy, but you have to play with the sizes. For example, the "doily" card is cut at 5 1/4" on fit to page using an 8 1/2 x ll" piece of card stock, but the "wish" sentiment had to be cut at 13" to fit properly!  Keeping an info card in the cartridge box can be helpful so you do not have to repeatedly remeasure these components.

Below, you will find just a few of the many cards I have created with this cartridge. Most of these have been featured on by blog!! Hope you come back again soon!!


Tuesday, November 8, 2011

Love you a Latte Card - Just Because

I made sure to vote on my way home from school today. It was very late, but I think every vote counts! When I got home, I had a wonderful treat waiting for me! The Just Because Cards cartridge was sitting on the counter, all wrapped up in the shipping packaging, just begging to be opened!!

There were two challenges I have been thinking about since the weekend and, after I put bunny to bed, I had a few moments of free time to craft! I told someone today that crafting is my therapy. I am able to focus on my creativity, not because someone NEEDS me to, but because I WANT to! So, I treated myself to a therapy session courtesy of Just Because cards and this is what I came up with. The two challenges are the Getting Cricky Simply Sunday Tea Time Challenge and the PDCC106 based on the colors pink, yellow and gray. The result was a gray, pink and yellow card featuring, my hot beverage of choice, a latte!

I combined the "Love you a Latte" sentiment (#11) with the Milk card (#9) base in yellow. I cut the envelope first on the fit to page button (4 1/4").  The houndstooth print envelope is cut from a BEAUTIFUL 12x12 pad I have from DCWV called Bella Armoire. I cut the card at 4" to make sure it would fit nicely into the envelope. The shift for the card is the strip of houndstooth paper that matches the envelope.

The sentiment was too small at 4" so I recut it at 5" out of the pink paper and then cut the shift with silver paper (both from the Recollections packages). The teacup and teacup steam (teacup layer) were both from Once Upon a Princess and were cut at 1". I attached the teacup using dimensionals to give it a pop and then applied a TINY bit of Star Dust Stickles to give the coffee mug a shimmery finish.


Monday, November 7, 2011

When You Wish Upon a Cupcake Card


I just stumbled upon the "Just Us Girls" Blog and was intrigued by the shape challenge (109) posted this week. The challenge was to use this picture for inspiration:


Looking at the shape for the challenge, I couldn't help but picture a triangle of icing on the top of a cupcake. I picked up the Once Upon a Princess cartridge and cupcake two was the perfect shape!

The doily design under the triangle reminded me of the Cricut Wild Card cartridge doily card and that is what made the entire project come together for me.

I cut the Doily card at 5 1/4" as the base and then added the "triangle," Once Upon a Princess Cartridge - Cupcake 2 - Button and Shift - 3".  The circle and burst on top came from the Classic Font Cartridge - Circle - 1"and Burst 1 1/4" For the burst on top, I made 4 and attached them together by punching a hole through them all and using a Recollections glitter brad to connect them. Then I bent up the edges to give dimension. I hand cut the little flag banner and then cut the word "wish" from the Wild Card cartridge (button 5 - Trifold Card - Shift on Phrase feature) at 13 1/2".

The finishing touch was a dimensional to make the burst at the top stand out, and a touch of Star Dust Stickles to add some bling to the word "wish." I am very happy with the card and can't wait for an occasion to give it to someone! I hope you like it too.


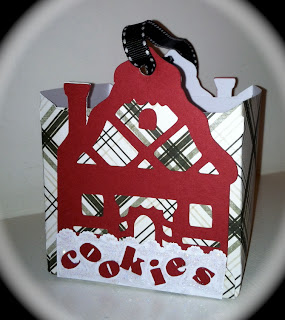
Cookie Cottage Box - Cricut Wrap it Up Cartridge


This adorable little cookie box was inspired by the Cooking With Cricut Cookie Monster Challenge. I have been waiting for an excuse to use the Box feature on the Cricut Wrap It Up cartridge, and this was just the project to do it with.

The box was cut using a 12x12 sheet of patterned paper. This is the Candy Cottage and was cut at 11 1/2".  The red detailing is the shift for the Box feature and that cut creates the detailing for both sides of the box. I had some scraps left over from a scalloped strip I used on a mason jar project and I used the white side to create snow for the bottom of the cottage. Then, I cut the word "cookies" using the Cindy Loo cartridge font feature at 1".

I added iridescent Stickles to give the snow a little sparkle. It's hard to see in the picture, but definitely adds just a little something extra! Finally, I punched a hole in each side of the box and used some left over ribbon from the same mason jar project to create a little handle for the box.

I am also going to enter this one into the Crafty Catz Anything Goes Challenge for a little extra fun!! Hope you enjoy it!

Sunday, November 6, 2011

You Are So Tweet Thank You Card


Cricut Wild Card Cartridge and Cindy Loo Cartridge


Since I was having so much fun working with the Pinwheel Card from the Cricut Wild Card Cartridge, I decided to do one more card with it. There were two challenges that inspired by card. The Fantabulous Cricut Blog For the Birds Challenge called for a project using a bird in some way and this seemed like the perfect choice! Then, the Clean and Simple Cas-Fridays challenge called for an element that went "Over the Edge," so I decided to have the little bird's beak peek over the edge as though he is flying off the page. So much fun!

For the envelope, I had this adorable Martha Stewart paper left over from my sister-in-law's woodland creature themed baby shower, and the colors inspired the rest of the card. The pinwheel is set to the word "Tweet," but if you spin it, it says, "You are so Tweet."

The card was cut at 6 1/4"  and the envelope was cut at 6 1/2." The word "Thanks" and the bird were both cut using the Cricut Cindy Loo Cartridge. The bird was cut at 3." Finally, I used an orange glitter brad to secure the wheel and Stickles for the little wings to add a bit of Glitter Panda bling! I hope you like it!!

Saturday, November 5, 2011

Posh Pancakes, Pajamas and Purses Party

Purse cut at 1 1/2" - Lipstick & Polish at 2 3/4" - Posh at 1"

It's been a long time between posts and although I was sad not to blog, I have been VERY busy with life in general. Lots of grading and family time activities. BUT...I was working on a fantastic project that I am excited to share. My bunny (daughter) is turning 6 and it is time to celebrate!  In true Glitter Panda fashion, I decided to use my Cricut to come up with fabulous invites for the super fun party theme we came up with. Bunny's party is going to be a Posh Pajamas, Pancakes and Purses Party. It will be a pretend sleepover featuring breakfast for dinner (one of Bunny's favorites), nail polish for all the girls, a movie with popcorn, and S'mores!

Since the party will be a smaller gathering, I decided I could make all of the invites myself using my Cricut. I chose the Wild Card cartridge and bravely attempted the Pinwheel card!!  The nail polish, lipstick, purse and the word posh on the card all came from the Forever Young cartridge.

I used my favorite Recollections card stock (Butterfly Wings package) for the cards, the round turning circle and the base of the lipstick. The envelopes were all made using a 12X12 pad from Me and My Big Ideas. The style is called Bliss. The brads I used to connect the wheel to the card are Recollections as well, and I found them in the clearance bin at my local craft store. Some are flat, and some are super glittery!! Finally, I added Cotton Candy Stickles to the word "posh" and to the lipstick for a little bling!!

By trial and error, I have learned that cutting the card 1/4" smaller than the envelope ensures a better fit for the card. So, the card was cut at 6 1/4" and the envelopes were cut at 6 1/2" (both on the blackout feature).  The cupcake with the actual invite info was created by running the card stock through my laser printer. Then, I used the center point function on the Cricut to cut around the words in the shape of the cupcake. Pop Up Glue Dots gave the dimension to the cupcake on the inside (and the purse, lipstick and polish on the outside). See below for sizes and more pics!

Unique Envelopes cut at 6 1/2" on Blackout feature - 12X12 Me and My Big Ideas "Bliss" Pad
Cupcake created with Celebrations cartridge - cut at 5 3/4" using Center Point