Tweet About Me

Follow Me on Pinterest

Thursday, August 2, 2012

Easy Butterfly Flower Card


Here's another simple card created with one of our CTMH Workshop on the Go kits. Unfortunately I created this before finding out that this Lucy Workshop has been discontinued, but I am including similar items for you to look at and if you already have the Lucy kit, you are good to go!
For this card, I relied heavily on the Cricut Art Philosophy cartridge. I started by cutting the flat card components and assembling them. I cut the flower shaped card base from Colonial White paper at 5 1/4". Next I used the Grey Woolx paper to create the circle, cut at 4 1/2". Finally, I cut 2 ruffled semi circles on page 69 at 1 3/4" using 2 of the duos patterned papers. When I was finished cutting these elements, I sponged the edges using the Round Sponge and the Olive Exclusive Ink. I used adhesive tape to put them together and then started on the dimensional elements. 
I used the Cotton Candy paper to cut the scalloped piece with a punch because I had already put my Cricut away, but you could definitely use the Cricut to make a similar shape for that component. I used the Lucy Compliments Glittery Rub On Sheets to add the cute little butterfly. These are no longer available, but there is a great Christmas themed set that will be fabulous for holiday cards! Be sure to go over the image you are adding a few times with the stick provided. This will ensure that the entire image transfers properly. Next, I added a few bitty crystal embellishments to the butterfly for a little "glitter." it also makes the butterfly look like it's flying. For the rectangle, I cut the Creme Brûlée paper to 2 1/2" x 2" and then stamped it with Olive Exclusive Ink. I used the stamp set that came with the Lucy kit. The quote is one stamp and the butterfly is another. I turned the stamp upside down to do the one on the top. I sponged the edges of these two elements with the Olive ink as well and then added the rectangle with 3D foam tape and used a smaller piece of that tape to add the pink scallop on top of that. When I finished the card, I felt like it was missing something, so I used some pink ribbon to create a little bow and attached it using my fave adhesive, Liquid Glass.
 I hope the past few posts have shown you that the Workshop On The Go Kits are very flexible and can be used to create not only scrapbook layouts, but also cards as well!

Since this kit is no longer available, I encourage you to check out some of the other NEW kits, including:
- Scholastic Kit - Great for back to school
Flirty Kit - fun and flowery
Scroll Album Kit - a great project
- Pear and Partridge - Christmas themed kit
- Moonlight Kit - Halloween themed
- La Belle Vie - Love themed kit

Also be sure to check out the 2 new card making kits just for people like me!! Avonlea and Partridge and Pear

Monday, July 30, 2012

Footloose and Fun


Happy Monday!! I decided it would be fun to keep going with my Workshops on the Go projects to give you an idea of all of the fun projects you can make with these kits. They all include the Close to My Heart Duos papers, plain papers a stamp set AND some sort of embellishment. When you by the kit all together, it ends up saving you some money and ensures all of the components look BEAUTIFUL together!

For this post, I have created a beach inspired card using the CTMH Workshops On the Go Footloose Kit. All of the papers are beach themed and the stamp set includes a starfish, seahorse, sand dollar, shell and fish! If you love to scrapbook, this is a great kit for putting together stunning layouts for beach vacations or just awesome days at the shore. 


To create this card, I started with a white 4"x6" card. I cut my cardstock to 8" x 6" and scored it at 4" to create this base. On top of that, I added the pale green "Sweet Leaf" stock, cut to 3 1/2" x 5 1/2". For the next layer, I added three separate pieces of card stock on top of the green stock. The larger piece on the left is 2 1/2" x 3" and the two on the right are 2 1/2" x 1 1/2" each.  


After I finished the flat card components, I created the three layer scalloped circle embellishment. The bottom peach "Creme Brulee" scalloped layer was cut using the Cricut Art Philosophy cartridge. I cut <circle2> on page 31 at 2 1/2".  On top of that, I glued <circle1> on page 21 cut at 2".  I cut another <circle1> to 1 1/2" and stamped it in Lagoon Exclusive Ink with the "Happy as a Clam" stamp (which is empty in the middle of the circle) and then added the "clam" stamp in the middle. I used 3D Foam tape to add it on top of the blue, "Lagoon" circle.  Finally, I used the Lagoon ink to stamp the sand dollar onto one of the Wooden Badge Button embellishments. The come with an adhesive strip on the back, so it was easy to add to the scalloped circle.


If you noticed that the layers stand out nicely against one another, that is because, before I started, I used the Round Sponge to sponge the edges of the card, and all of my other layers with Cocoa Exclusive Ink. This adds dimension to the card and looks awesome!  


I hope you enjoyed this card and will try it yourself. Have a great week!!
XO
-Jamie
Glitter Panda

Friday, July 13, 2012

Inspired by the wait


I had to go to my undergraduate university today to get an application for a professional certification program. As I approached the office door shortly past 11:00, after being redirected to the appropriate one 3 times, I saw the sign that proclaimed they would be back at 1:00. I left the building and sat on a bench in the quad I spent so many moments in a hundred years ago.

The wait inspired me to create this lesson. I think I will use it for my Freshmen this coming school year. I hope it inspires you too.

A moment of inspiration - a lesson in imagery

Stop where you are. Sit down. Take a moment to view your surroundings from that perspective. Take a picture of the angle that catches your attention. Write one paragraph describing the sensory experience in that moment.

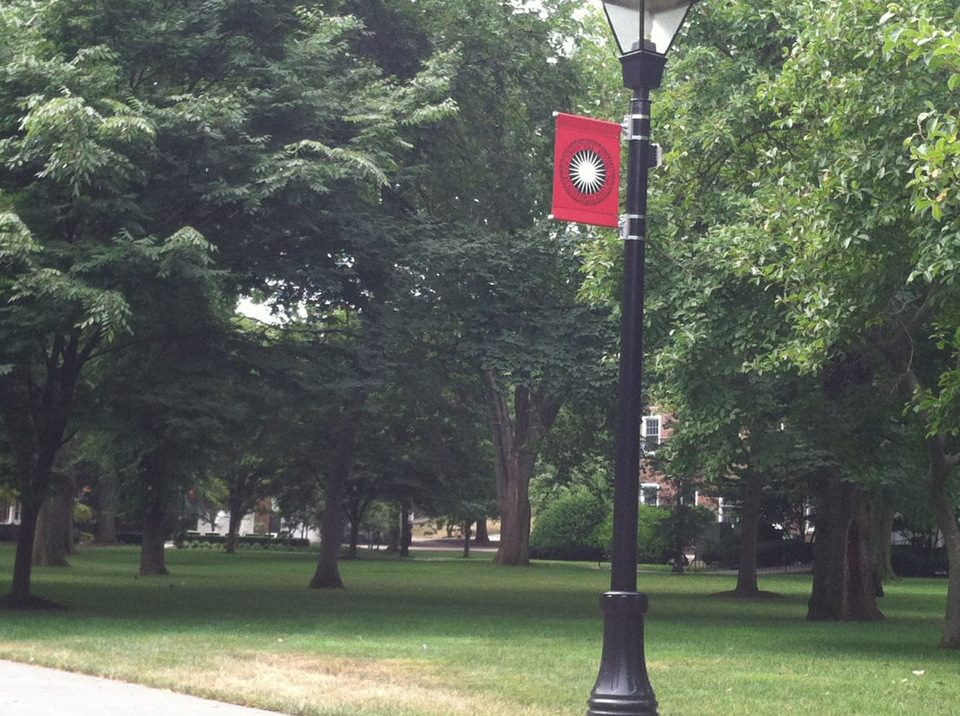
(Sight) The trees formed a canopy over the quad that reached from one end to the other. Shaded areas looked inviting, almost begging for a picnic lunch to be enjoyed on the soft carpet of lush green grass. The vibrant scarlet, black and white University flag stood out against the deep green background as a symbol of education tucked into the natural landscape. (Smell) The air was clean, untouched by the scents that would soon rise from the grease trucks to blend in a symphony of salt-pepper-ketchup as the students here for summer classes grabbed a quick bite on their way to, or from, their last, or next, class. (Taste) The air carried the tang of summer into my mouth as I inhaled and the taste of the Lush Bubblegum Lip Scrub left sweet remnants behind that made the experience even sweeter. (Touch) Slowly, the heat of the late morning sun pressed on my soft black yoga pants with intensity as though asking why I insisted on wearing black on such a sunny day. (Sound) For a brief moment, only silence intermingled with birds chirping, until the sounds of classes letting out brought passersby, hints of their diverse conversations lingering even after they'd walked past. (Memory/connection) My mind's eye saw the surroundings as they were when I was here. In my memory, some students rushed to classes, while others took in the sun on towels their parents had lovingly selected with them at Bed Bath and Beyond a few weeks before the semester started. The strong sensory experience, paired with the ghostly memories provided the perfect moment of reflection. In that moment, I was a student, an educator, and a student once again.

It would be great to have more examples, so I hope you will take your own moment and share your paragraph (or even sentences) with me!

Thursday, July 5, 2012

Pemberley On the Go Flower Card


Good Morning!! I'm so happy to be guest blogging for Cricut is Close to my Heart again today. I hope everyone had a wonderful Fourth of July!

Today, I have a card I created using the CTMH Workshops On the Go Pemberley Kit. This was something I had my eye on for awhile before I decided I HAD to have it. The cool blues and yellows in this pack complement each other beautifully, and I love the big flowers and the sweet embellishments it comes with.

The card base for this project is Outdoor Denim card stock and was cut at 6" x 12" and scored at 6" to create a 6" x 6" square card. The next square layer is Desert Sand card stock and was cut to 5 3/4" x 5 3/4". I attached this layer using dimensionals to give the card a little pop.

Then, I attached the scalloped rectangle. This was created using the <Rctngle2> button on the Cricut Art Philosophy cartridge cut at 4 1/4". You can find this cut on page 54. I attached the smaller 3 3/4" x 3 3/4" square on top of that. This was cut from one of the Pemberley duos papers. Both of these elements were added using the Bonding memories broad tip glue pen.

Cut the left side off the rectangle to keep it from showing from behind the square
Next, I added the vertical blue strip cut from Pacifica card stock at 2" x 6". Over this, I added a 4" <Circle1> cut from Art Philosophy. This image is on page 21of the booklet. The circle was added using dimensionals as well. I sponged the edges of the circle with the Olive Exclusive Ink Stamp Pad using the round sponge.

Finally, I used the dimensionals to add the big flower that I cut from the Pemberley duos paper using the fabulous micro-tip scissors. I also sponged the flower with the olive ink. I finished the card with bitty opaque pearl adhesive gems for a pretty touch.

You can see the added dimension from this angle...and the cute bitty pearls

The Pemberley Workshop on the Go Kit contains all of the paper and embellishments you will need to complete this project! I hope you like the card and that you'll try to make one on your own!!

Sunday, June 17, 2012

Dotty for Dad


Hello again! I am guest blogging on Cricut is Close to My Heart today!! Here is my post:  I hope everyone had a wonderful Father's Day...I know we sure did. Today, I want to share the card I made for my wonderful father and my amazing husband. I was inspired by the 7" x 5" R Card artwork on the back of the Dotty for You paper pack. I found this card to be quite versatile, and I was able to make just a few changes to make it masculine instead of feminine.

I started with a 7" x 5" card base for both cards. One in Kraft and the other in yellow. For both cards I added the big dot paper as the background. This took the place of the butterfly paper from the back of the paper pack. I cut this later at 4" x 6" so it wouldn't show from behind the frame layer I added next.  I cut the frames using the Cricut Art Philosophy cartridge <Rctngle1> image at 4". For the Kraft frame, I used the mini yellow polka dot paper and for the Yellow frame, I used the blue mini polka dot paper. Both the big dot layer and the mini dot layer were added with dimensionals to give the card a fun twist.

Before I added the frame layer, I turned it over and added some green ribbon to it so it would show though. I used my trusty liquid glass adhesive to secure it to the back and put the adhesive on the back of the frame so it wouldn't show. Then I added the dimensionals and attached the frame. Finally, I used my Cricut Wild Card cartridge to cut the Happy Father's Day sentiment at 9 1/2". That is the <father> image on page 66. Both my father and my husband loved the cards and I hope you do too!!  See you soon!

Panda Hugs!
-J

Sunday, May 20, 2012

Dotty Simple Best Wishes Card


Hi there and happy Sunday! I am so excited to be back as a guest blogger over at the Cricut is Close to My Heart Blog! Since I went complicated the last time I was there, I thought it would be appropriate to go super simple this time. Our very close family friend just graduated from Nursing school after a long program to go from an LPN to an RN. She has worked tirelessly and we are all so proud of her.

I wanted to create a pretty card that was also simple. I also wanted the sentiment to include the idea that she is going on to receive her Bachelor's of Science in Nursing as well. I thought that a Best Wishes ard would say everything there is to say. That considered, I have also been so excited to use my Dotty for You papers! I went super simple by forgoing my usual Cricut cuts and just using my trusty paper cutter and some mono adhesive.

Here's the recipe if you'd like to try this simple card:

Front of Card:

Card base - 5" x 10" scored at 5"
2nd layer - 4 3/4" x 4 3/4"
Top layer - 4 1/2" x 4 1/2"
Polka dot band -  4 1/2" x 1 1/4"
Stamped band - 4 1/2" x 1"
I stamped the band in Lagoon ink

Inside Card:
 2nd layer - 4 1/2" x 4 1/2"
Top Layer - 4" x 4"

Make sure you use a light color for your top layer inside to write on!!


I hope you'll try to recreate this simple card!

Panda Hugs!

Jamie (aka Glitter Panda)

Sunday, May 6, 2012

I'm Back!

I feel as though I have been away from my blog forever! It has been crazy here at the Panda household, but things are finally getting back to normal. As I have said before, I am a teacher, and I am also the yearbook adviser. I was working on a very difficult end of year yearbook deadline and couldn't stop to "smell the roses" for even a moment. When I finally finished that, my body decided it would be a fabulous time to get very sick for a little while. This past week, I finally started feeling better but had to finish preparing for Cubby's basketball birthday bash! We had the party today and it was a blast. The kids had a great time and Cubby loved it!! I will post pics of the party favors shortly because they were too cute not to share. I know I missed a couple of holiday card posts as well, so you can be sure that as soon as I can create them, I will share them!! Have a wonderful week and talk to you soon!!
BIG Panda Hugs!
J-
Glitter Panda