Tweet About Me

Follow Me on Pinterest
Showing posts with label ribbon. Show all posts

Monday, April 9, 2012

I'm a Guest Designer


It has been a VERY long week, but it has been a lot of fun. Between being off for spring break and all the holiday celebrating, it will be hard to get back into the swing of things. This week, however, I am so excited about my guest designing spot on Use It Tuesday! The Anything Goes challenge is definitely a a favorite of mine. At first I thought it would be fitting to create something that reflects who I am as a crafter and I think I hit it right on the head with this Glitter Panda shaker easel card. I have been holding on to this adorable panda stamp for quite some time and this seemed like the perfect chance. I dipped into my extensive stash of paper for this one and then used my pearls, glitter and ribbon too. I even created the flower using a punch instead of my go to Cricut cartridges. Then, I needed to make an Easter card for my mother-in-law and fell in love with that one! So, I decided to post the Easter card on Use it Tuesday and here it is:

There are a few techniques I want to explain with this one, so I will create another post to explain how I made it, but wanted to include it here today :)


Panda hugs!
J-
Glitter Panda

Check out my posts on how to create an easel card and my video on how to create a shaker card to learn the techniques I used here!

Monday, February 27, 2012

You're Boot-iful

Since I already posted today, this one is super quick. I am obsessed with my new SEI Couture stack paper!! This is my latest card.

Panda Hugs!
J-


Recipe

Card Base

1. Cut a piece of lavender Recollections card stock to 10" x 5" and scored at 5"
2. Cut a piece of dark purple Recollections card stock to 4" x 4" and ran it through the cuttlebug
3. Cut a strip of bright green paper to 1" x 5" and used blue Offray 1/8" ribbon (taped it behind the strip)
4. I added the green strip to the lavender base and then adhered the dark purple on top of it

Boots

I used the SEI Crafts Couture stack and the Cricut Create a Critter cartridge p. 31 <Duck> cut at 18" on the accessories function.  I tied a piece of white Offray 1/8" ribbon to each to look like laces.  Finally, I added bigger clear jewels across the top and Recollections green jewels down the toes

Sentiment

Used my computer and typed out "You're Boot-iful" - printed it on bright green card stock and then punched it out with my Recollections scallop punch. I cut two more scallop punches in lavender and yellow and added them together (staggered) with dimensionals. Finally, I cut off the bottom of the sentiment scallop so it lines up with the edge of the right boot.

I am entering this card into the following challenge:

Bitten by the Bug 2 - Nate's ABCs/Boots

Monday, February 13, 2012

Wind Beneath My Butterfly Wings


When I saw the Cookingwithcricut.com Love Song Blog Hop theme, the song "The Wind Beneath my Wings", by Bette Midler, immediately came to mind. I am obsessed with the Rock Princess cartridge, so I used the butterfly from it and some pretty lace, ribbon and DCWV  Bella Armoire stack paper to create this layered card. I placed circle and scallop with the LOVE sentiment just beneath the butterfly wing to hint at the song title.  I have been creating so many cards for Valentine's day that I am not including the exact recipe here, BUT if you would like the details, let me know and I would be happy to send them to you!

I hope you'll also check out my teacher Valentines and the little poem I wrote for the night before Valentine's day...HERE!

I am entering this card into the following challenges:


Wednesday, February 8, 2012

Happy Birthday Dear Trees...


Suprise, surprise, another holiday is here! I never realized how many holidays there are on the calendar until I started my card making adventure.

Today is Tu B’Shevat, the 15th of Shevat on the Jewish calendar.  This holiday is known as the “New Year for Trees." The literal significance of this holiday has to do with a seven year growing cycle and helps to determine in which year a tree is ready to be harvested for fruit. To celebrate, many people eat fruits that grow on trees, particularly in Israel, including grapes, figs, pomegranates, olives and dates. Many Hebrew schools hold what is referred to as a Tu B'Shevat seder, in which the children enjoy many different fruits.

My holiday card adventure gave me a chance to take a break from making Valentines, so I thought I would try something creative. The card I made for Tu B'Shevat is simple, but I think it properly celebrates trees. It is my first stair step card, so I am still getting the hang of it, but my son loved it and that is all the encouragement I need to keep trying!

Recipe

Stair Step Card Base

1. Start with a piece of card stock cut to 5 1/2" X 10 1/2"

2. Score at 1 1/4", 2 1/2", 4 1/4", 6" and 8 1/4"

3. Fold up and down for alternating score lines (mountain/valley style)

4. Decorate each step

5. The the first step is 1 1/4" x 5 1/2" - I used green recollections card stock for the border. It is cut from the Cricut Holiday Cakes cartridge, pg. 51 <Baby3> at 1 1/4".

6. The second step is 1 3/4" x 5 1/2" - I used brown recollections card stock, the same cut for the border as step one, but this one was cut at 1 1/2". I used my paper trimmer to cut it to 5 1/2" in length.

7. The third step is 2 1/4" x 5 1/2" - I used green recollections card stock for the border. It is also cut from the Cricut Holiday Cakes cartridge, pg. 51 <Baby3>, but this one was cut on the plain base function at 1 1/2".  I trimmed this to 5 1/2" as well. Next, I added some LACE stretch ribbon on top of the border.

Scallop Doily

The embellishment for the first step is a doily from the Cricut Cindy Loo cartridge <Doily4> cut at 2 1/2".  The top is cut from DCWV Mariposa Matstack glitter paper and the shadow is cut from brown recollections card stock.

Tree

The tree for the third step is the <tree> image from the Cricut Best of 2010 cartridge cut on the regular button and the shift. I attached it using dimensionals so it stands out too.

I am entering my card into the following challenges:
FYI Challenge #23 - The levels of the church reminded me of the stair step card & they both have a religious component
Shopping our Stash Weekly Challenge 38: Hearts, Valentines and/or Lace

Monday, November 7, 2011

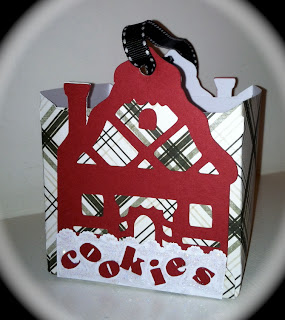
Cookie Cottage Box - Cricut Wrap it Up Cartridge


This adorable little cookie box was inspired by the Cooking With Cricut Cookie Monster Challenge. I have been waiting for an excuse to use the Box feature on the Cricut Wrap It Up cartridge, and this was just the project to do it with.

The box was cut using a 12x12 sheet of patterned paper. This is the Candy Cottage and was cut at 11 1/2".  The red detailing is the shift for the Box feature and that cut creates the detailing for both sides of the box. I had some scraps left over from a scalloped strip I used on a mason jar project and I used the white side to create snow for the bottom of the cottage. Then, I cut the word "cookies" using the Cindy Loo cartridge font feature at 1".

I added iridescent Stickles to give the snow a little sparkle. It's hard to see in the picture, but definitely adds just a little something extra! Finally, I punched a hole in each side of the box and used some left over ribbon from the same mason jar project to create a little handle for the box.

I am also going to enter this one into the Crafty Catz Anything Goes Challenge for a little extra fun!! Hope you enjoy it!