Tweet About Me

Follow Me on Pinterest
Showing posts with label cuttlebug. Show all posts

Tuesday, April 3, 2012

The End of March Madness


With March Madness coming to a close, there is no better time to create a basketball card! My son was at a basketball clinic all day today and then came home for 30 minutes and turned around to go to basketball practice! So you can imagine basketball is pretty big around here. One of my son's travel team teammates is having a birthday party party this week, so I decided to create this basketball birthday card.  I specifically chose the black and white striped paper reminded me of a referees uniform! It is so much more masculine than the cards I usually make, so I am proud of myself for going outside my comfort zone!
 
To create the card, I used the Cricut Art Philosophy cartridge for the banner and the border. The basketball is from two of the layers on the basketball image on the Cricut Best of 2008 cartridge. Here is a side view so you can see that the banner is added with 3D Foam Tape. I ran the orange ball through the Cuttlebug with the Swiss Dots folder to make the texture more basketball-like. I sponged the edges of all of the layers and embellishments. I used the Close to my Heart "Celebrate" stamp for the first time and used Cocoa ink for the softer color. The little metal basketball is a brad I have been holding on to for a while. I thought that added just the right finishing touch!
Bye bye for now...Panda Hugs!
J-
Glitter Panda
I am entering this card into the following challenges:


Use it Tuesday Challenge #28 - Uninked Stamp - I used the Celebrate stamp that came with my CTMH Cricut collection (I also used the basketball brad I've been hoarding, the striped Recollections paper I have had but never used and my go to plain card stock that is taking over my dining room!)


Monday, February 13, 2012

Wind Beneath My Butterfly Wings


When I saw the Cookingwithcricut.com Love Song Blog Hop theme, the song "The Wind Beneath my Wings", by Bette Midler, immediately came to mind. I am obsessed with the Rock Princess cartridge, so I used the butterfly from it and some pretty lace, ribbon and DCWV  Bella Armoire stack paper to create this layered card. I placed circle and scallop with the LOVE sentiment just beneath the butterfly wing to hint at the song title.  I have been creating so many cards for Valentine's day that I am not including the exact recipe here, BUT if you would like the details, let me know and I would be happy to send them to you!

I hope you'll also check out my teacher Valentines and the little poem I wrote for the night before Valentine's day...HERE!

I am entering this card into the following challenges:


Saturday, February 11, 2012

A Basketball Party


My how time flies when you're having fun...almost 9 years ago, our family was blessed with a beautiful baby boy, and this April, he will be 9 years old! In 9 years, a lot has changed. We even watched him learn to walk and talk and watched him welcome his little sister into the world 6 years ago.  Our Cubby has been interested in many things. He tried baseball and soccer, hip hop and gymnastics and finally...basketball.

Although he still enjoys hip hop, basketball has consumed most of his time. Between two travel teams and a couple of recreational leagues, it seems we are at some game or another almost every day!  So, it came as no surprise that he has chosen to have a Basketball themed Birthday Party!!  I am excited to create all of the extras for this party (and even more excited that it will NOT be at my house!).

The first step in the party prep process is the invitation. I decided to break out my Cricut, Gypsy and Cuttlebug to create the perfect basketball invitations!!

Recipe

Card Base

I used the Gypsy to weld two circle bases together. I used the Cricut Best of 2008 cartridge for the basketball image. I used <Basktbal> on Layer 1 with the shift selected (at 5" width, 10.93" height) to create the circles and then the square (1.04" width x 1" height) welding them together is from the Cricut Classic Font cartridge (but you can use George or any other cartridge with basic shapes on it).  After cutting out the two welded circles with the square in the middle, I scored the middle of the square to make sure it folded more easily.

Next, I closed the card and ran it through my Cuttlebug Swiss Dots Folder to create the basketball texture.

The black basketball lines are also from the same <Basktbal> button, but on the regular shift button. I attached the lines to the circle with monoadhesive.  Finally, I used a white Galaxy gel pen to create the stitching on the black lines.

Invitation wording and circle

To create the message inside, I used my laser printer. I used a piece of green Recollections card stock and ran it through the printer. I typed out my message in Word and made sure it only went to the 4.5" mark on the document. This will let you make sure it doesn't go beyond the size of the circle. The circle is another 10" <Basktbal> cut.  I used the Center point function to create the circle around the words. You just push the center point button and position the blade right in the middle of the card. I experimented to see exactly where the best place to cut would be.  Finally, I attached the circle to the inside using monoadhesive.

Here is the Gypsy cut file for the basketball invitation - Enjoy!

I am entering this card into the following challenges:

She's a Sassy Lady - Gypsy Created Shape Card Challenge
Little Scrap Pieces: Anything Your Heart Desires Challenge

Thursday, February 9, 2012

Love Bites


I have two guilty pleasure in life. These are things that make me ALMOST as happy as spending time with my family (since nothing can top that!). The first is crafting, especially with my Cricut. Between my cricut, my paper trimmer, my new Cuttlebug and my Gypsy, I have truly turned crafting obsessed.

My second guilty pleasure is silly paranormal romance novels, the cheesier the better! As an English teacher, I encourage my students to read on a daily basis. I teach them fantastic classics, such as Romeo and Juliet, Of Mice and Men, To Kill a Mockingbird and more. When I get home, however, I just want to unwind. Sometimes that means reading as mindless a novel as I can get my hands on. In the classic tradition of cheesy paranormal romances, I can very much appreciate a good vampire, were creature or fairy story with the best of them.

With this in mind, I decided to make a Valentine's Day card for a good friend of mine. She is also an English teacher and we often bond over the latest novel in the next best vampire series. I thought I would take Valentine's day in a totally different direction and I think this card pays proper homage to vampires everywhere.


Recipe

Card base

1. DCWV La Creme Stack - cut a piece of 12" x 12" card stock down to 12" x 6" and scored at 6" to make the card. I used my bone folder to get a nice crease.

2. Cut a piece of Recollections pink card stock to 5 1/2" x 5 1/2" - Then, I ran it through my Cuttlebug with the swiss dots folder. The folder wasn't big enough so I did half and then lined it up and ran the other half through.

3. Added a piece of black card stock cut to 4 1/2" x 4 1/2" - before adhering it with monoadhesive, I added a piece of stretch lace ribbon and folded it around the back. I secured it with scotch tape in the back since you can't see it under the layer.

4. I topped off the card with a top layer cut to 4" x 4" from the DCWV Mariposa Matstack

Embellishments

The pink and red heart are from a new Recollections 1 Lb Assorted diecut bag I picked up on clearance for only $4.99 last weekend. I used a white Galaxy gel pen to add the stitching. These were adhered with one layer of pop dots.

The flying vampire heart is from the Cricut Rock Princess cartridge...love this one!!
The image is <Heart2> on p. 44 and was cut at 2". The shadow is black, the base cut is white, The shift is the dark pink,  layer 1 is red and layer 1 shift cut is light pink. I added my own hybrid sentiment by using a studio G stamp for the word LOVE on one wing and then using a stamping marker to write the word "Bites" in script on the other wing.

I am entering this card into the following challenges:

Saturday, February 4, 2012

A Joyful Gift of Love(bug)


Happy Saturday! I am having a wonderful day. This morning, my son's rec basketball team had a game. The other team was VERY aggressive. After being hit in the head with the basketball, my son was very frustrated. We had a talk about the fact that his team plays fairly and I told him that the best way to pay the other team back for bad behavior would be to win. 30 minutes later, his team won 22-16!

After we got home, my husband took the children to the Home Depot workshop to make heart boxes for Valentine's Day and I was able to get my lesson plans done.  My son and I worked on some fun crafty Valentine's for a while and then, my sister and brother-in-law and new baby niece came over and we got to spend some time together.  All in all, it was a great day!

One of the crafts we worked on was this adorable lovebug gift card holder. I used the recipe for a Joy Fold card and, instead of keeping the bottom flap open, I used adhesive on the right and left side to create a pouch for a gift card!


Gift card pouch on the inside
Recipe
Joy Fold Gift Card Holder
Base – 4 ¼ X 6 ¼
Score – 4 ¼

Smaller card – 3 X 6
Score - 3

The pink and white base card is from the My Mind's Eye Love Nest Stack by Carina Gardner and the red card on front is from the Mariposa Matstack by DCWV. I used a piece of pink Recollections cardstock for the layer on the inside and ran it through the Cuttlebug with the Swiss Dots folder.

Flying Heart, Ladybug & Lovebug sentiment

Both are cut at 2" from the Cricut Create a Critter cartridge on p. 66
<Ladybug1> standard cut and <heart> shift cut - I cut the regular cut, layer 1 and layer 2 for both
I used Recollections cardstock for the ladybug and the winged heart shadow. The wings match the My Mind's Eye Love Nest paper.


I am entering this card into the following challenges:
Cooking with Cricut - Challenge #71: Child's Valentine - Must use Pink, Red and White
card makin' mamas - Challenge #38: Valentine 
My Sheri Crafts Challenge #78: Love is in the Air 
Die Cuttin' Divas - Challenge #50: Anything Goes 

I am also linking to:
Sundays are Lovely #6 at Jaihart

Thursday, February 2, 2012

Happy Groundhog Day!


Happy Groundhog Day! Every time I blink, another holiday pops up, just like this little groundhog who is checking things out.  To be honest, with the 63 degree weather, this little guy probably came out early and was sunbathing on the beach in NJ yesterday!!

Last night, I was talking to my friend who inspired me to start my Year of Holiday Cards extravaganza, and we were having a hard time coming up with ways to celebrate Groundhog Day. I suggested that either she should repeat everything she says twice, or make shadow drawings. If you have any suggestions, leave me a comment and I will suggest them to her. I had a lot of fun with this card and with my new Cricut Designer's Calendar cartridge! I thought it would be perfect for my holiday-based endeavor and, immediately, it has come in handy.

Recipe
Card Base
Card is the <Milk> card from Just Because Cards cut at 5 1/2" from the
Martha Stewart Woodland Critters Stack
All of the layers are cut from Recollections cardstock
Yellow layer is cut to 4 1/2 X 4 1/2 and embossed with flowers on my Cuttlebug
Orange layer is cut to 4 X 4
Wood Grain strip on top is cut at 4 X 2 and is the flip side of the paper used for the base card

Groundhog with shadow
Brown groundhog is cut from Designer Calendar cartridge cut at 3 1/2"
White shadow is the same cut at 3 1/4"
The black hole is the <Skunk> cut from Create a Critter at 2"
I used a white gel pen to go over the contour marks on the groundhog to make them stand out more and used Stickles on the white shadow and the black hole for a glittery effect
I used two layers of dimensionals to attach him so he would stand out more than the sentiment

Sentiment
<March> Cut in brown and white, both at 1" from the Designer's Calendar cartridge
I layered the two colors on top of each other for a shadowed effect
Then, I added Stickles to the white layer to up the sparkle effect
I used one layer of dimensionals to make the sentiment pop!

I am entering this card into the following challenge:
Simon Says Stamp - Animal Antics

Sunday, January 29, 2012

My First Explosion Box

I am SO excited to share this special Valentine's Day project with you! This weekend, I was searching the web for new and exciting project ideas and came across a craft that immediately caught my attention. It's called an explosion box. Think pretty gift box meets awesome scrapbook or photo album and you have the idea. There are a good number of tutorials out there on how to create these adorable boxes, so I looked at a bunch and took the components I liked most to create mine. I added a bunch of pockets that I slipped little gift tags in to make it an extra special Valentine's gift.

I am VERY happy with the result, but the process was a little painful. The biggest problem I had was making the top of the box. The instructions I used said to cut the top at 8 X 8 and I thought I did that, but I actually cut it at 9X9 because I am still getting used to my paper cutter. Then, I redid it at 8X8 and the top was too small. Finally, just like Goldie Locks...3rd time was a charm...I split the difference and cut the third top at 8.5 X 8.5 and that finally did the trick!

I am not sure if you can see in the picture, but I also used my BRAND NEW CUTTLEBUG to emboss flowers on the top layer and to line the pockets on the middle layer!

It is very hard to "get" what an explosion box really is without seeing it in action, so I am adding my very first video here to show you! Explosion Box Demonstration

Recipe

Box
Bottom layer (outside of box) - 12" x 12"  - Score 4" in from all sides
Middle layer - 11" x 11"  - Score 3 3/4" in from all sides              
Top layer - 10" x 10" - Score 3 1/2" in from all sides

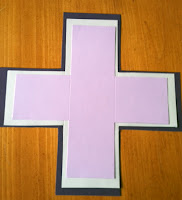
Cut out the corners from all three sheets so they look like this:

Lid:

Use a piece of cardstock cut to 8.5" X 8.5 "  Score 2" in from each side. Then, score the four corners on a diagonal as well. Fold each corner in and glue it to the side to create the lid. Use paper clips to keep the lid together while the glue dries. I didn't have any paperclips, so I used my daughter's hair clippies! Here is a pic of the first lid I made while it was drying (I did NOT end up using this one):
Final Lid

Embellishments:
I added fun details to the four side panels on all three layers. 
I created triangular pockets for tags using another technique I will feature in another blog post
 On the bottom layer, I used a pretty light pink ribbon with hot pink stitching
I added a beautiful flower from the Cricut Pagoda cartridge (Flower8 p. 57) on the top - I used dimensionals for a more 3D effect
I finished the top flower with Stickles in the middle for a Glitter Panda sparkle

Middle Archway Structure
I used the archway design from The Disney Princess cartridge to create the arch
Then, I flipped it and added a square in between the two and welded them together with the Gypsy
Once it was cut out, I folded up the two sides and that made the archway stand up!
I added the pagoda flowers using dimensionals and Recollections Brads for the middle