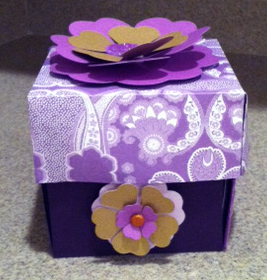


I am not sure if you can see in the picture, but I also used my BRAND NEW CUTTLEBUG to emboss flowers on the top layer and to line the pockets on the middle layer!
It is very hard to "get" what an explosion box really is without seeing it in action, so I am adding my very first video here to show you! Explosion Box Demonstration
Recipe
Box
Bottom layer (outside of box) - 12" x 12" - Score 4" in from all sides
Middle layer - 11" x 11" - Score 3 3/4" in from all sides
Top layer - 10" x 10" - Score 3 1/2" in from all sides
Cut out the corners from all three sheets so they look like this:

Lid:
Use a piece of cardstock cut to 8.5" X 8.5 " Score 2" in from each side. Then, score the four corners on a diagonal as well. Fold each corner in and glue it to the side to create the lid. Use paper clips to keep the lid together while the glue dries. I didn't have any paperclips, so I used my daughter's hair clippies! Here is a pic of the first lid I made while it was drying (I did NOT end up using this one):

 |
| Final Lid |
Embellishments:
I added fun details to the four side panels on all three layers.
I created triangular pockets
for tags using another technique I will feature in another blog post
On the bottom layer, I used a pretty light pink ribbon with hot pink stitching
I added a beautiful flower from the Cricut Pagoda cartridge (Flower8 p. 57) on the top - I used dimensionals for a more 3D effect
I finished the top flower with Stickles in the middle for a Glitter Panda sparkle
Middle Archway Structure
I used the archway design from The Disney Princess cartridge to create the arch
Then, I flipped it and added a square in between the two and welded them together with the Gypsy
Once it was cut out, I folded up the two sides and that made the archway stand up!
I added the pagoda flowers using dimensionals and Recollections Brads for the middle

I am entering this project into the following challenges:
The Cuttlebug Spot - Box It Challenge
Paper Crafting Journey - Challenge #1 - Floral
Bitten by the Bug 2 - Bloom Dimensional Flower - Cricut Pagoda cartridge Flower8 p.57
Simon Says Stamp Challenge - Anything Goes
Link Parties
Jaihart - Sundays are Lovely #5
The Cuttlebug Spot - Box It Challenge
Paper Crafting Journey - Challenge #1 - Floral
Bitten by the Bug 2 - Bloom Dimensional Flower - Cricut Pagoda cartridge Flower8 p.57
Simon Says Stamp Challenge - Anything Goes
Link Parties
Jaihart - Sundays are Lovely #5
OMG, how GORGEOUS! Love your color choices and the fab structure in the middle is sooo cool. Thanks for joining us at BBTB2. xxD
ReplyDeleteHow Fun is that! I have yet to try one of these but it is on my "Must Do" list, lol! Your's turned out amazing and how fun with all the little pockets. So glad you shared with us over at BBTB2 off to check out your video!
ReplyDelete((Hugs)) Theresa
What a great tutorial! Thanks so much for joining my link party! Hope you're having an awesome day! Smiles, Jill
ReplyDeleteWonderful wonderful wonderful. I LOVE making explosion boxes because they are fun to make (once you get the sizing downpat) and the end result is so rewarding, and the fact that these little wonders can fit the bill for any event makes it a perfect creation. Thanks so much for joining us at BBTB2.
ReplyDeleteCarole
Gorgeous explosion box. Thanks for joining in at the Cuttlebug Spot this week.
ReplyDeleteFantastic!!! Love the flower on the box lid. Thanks for sharing with us at BBTB2.
ReplyDeleteGreat job at your first box, it is gorgious and I love all the secret pockets!! Supercute!
ReplyDeleteThank you so much for joining us at the "Box It" Challenge at the Cuttlebug Spot!
Cuttlebugs & Hugs
Jannie
Beautiful project - love all the tags and pockets x
ReplyDeleteThanks for playing along @ paper crafting journey & good luck x
((hugs)) Suzie xoxo
Fabulous box!
ReplyDeleteThanks for playing at the Cuttlebug Spot...hope you'll join us tomorrow for another fun challenge!
Helen x