Tweet About Me

Follow Me on Pinterest
Showing posts with label recollections. Show all posts

Saturday, March 17, 2012

Irish Eyes Are Smiling


Happy St. Patrick's Day!! If you are celebrating, I hope your day is full of fun and excitement!! We're going green here to celebrate. Although the holiday is today, my card was actually ready last week and is now finding its home in IRELAND! I knew I was going to make a card to celebrate my Year of Holiday Cards, and always love when I have a fabulous use for my cards. This one was great because I sent it to my brother-in-law's family in Ireland!!

I don't have the recipe for this one because I had to make it in a hurry, but you can find the recipe for my easel cards here. I used the shaker card process as well for the top layer. This was nice and easy because I used tiny shamrock die cuts from the Cricut Designer's Calendar cartridge inside (all shamrocks on the card, including the cutout are the same cut at different sizes), so the foam tape could have small gaps without the filling falling out. For embellishment on the top card, I hand stitched the card with my white gel pen, and added green Recollections crystals. On the bottom card, I added rainbow ribbon with green glitter ribbon over it (both are taped down under the layer), and stamped it with my Studio G stamp that has a horseshoe with the words Luck O' the Irish all the way around.

Panda Hugs!
-J

I am entering this card into the following challenges:

Sentimental Sundays Challenge #93 - Go Green or RECYCLE!

Simon Says Stamp - A Bit O' Green

Use it Tuesday Challenge #27 - Green! - (used my go to Recollections paper, my crystals from my stash, and Offray rainbow ribbon I have had for 100 years!)


Tuesday, March 6, 2012

Fishing you a Happy Birthday!


Yesterday morning, I came downstairs to find my almost 9 year old, Cubby, watching TV. I am slightly embarrassed to say that he is usually indulging in a Spongebob episode that he has already seen 1000 times. Yesterday, however, he was watching Sports Center! I don't know why, but the idea of my baby watching sports on TV made me exceptionally emotional. I know it seems silly, but they REALLY do grow up quickly.

If you follow my blog (or stop by from time to time) you probably remember my friend who inspired me to begin my "Year of Holiday Cards" project. Well, her birthday is tomorrow and I felt it only appropriate to make he something special to celebrate. I decided that she would be the recipient of my very first easel card. With the help of an online tutorial by Splitcoaststampers, I was able to complete my task!! Thanks to them for the easy to follow instructions! I don't have a stamp that works with a fishy birthday card, so I came up with "Fishing" You a Happy Birthday! I printed it out from my computer and cut it out with my Recollections scallop punch. I thought it looked lonely as one layer, so I added two more scallops behind it in a staggered arrangement, and that also served to let the easel card rest against it.

Panda Hugs!
J-

Recipe

Easel Card Base

Piece of plain purple Recollections card stock 4 1/4" x 8 1/2" - score at 4 1/4" and 6 3/8"
Fold in half and then fold the small section in the opposite direction
With the small section up, add adhesive and attach a 4 1/4" x 4/14" card from the top of the section


The video from Splitcoaststampers helped me to understand exactly what to do, so definitely check it out! 

Top card

I cut the frame for this card from the SEI Crafts Couture stack at 4 1/4" and used the same cut I did for my Shadow Box Card.  The fishbowl and fish are both from the Cricut Create a Critter cartridge. <Fishbowl> is the shift cut and I set it to 2" and used layers 1, 2 and 3 on the shift as well. <Fish> is cut at 1" and it is the regular cut. I used layers 1-3 for this as well. I added Stickles to the middle of the fish to make it stand out. The sand layer for the bowl was cut with the the glitter paper in the Mariposa mat stack. After I assembled the bowl, I added the fish with a pop up glue dot and then the bowl was added to the card with pop up glue dots as well. I added 2 sizes of light green Recollections crystals to look like bubbles coming out of the fish's mouth. Finally, I added three Recollections pearls to the card for an extra touch.


Bottom card

I added a white square cut at 4" x 4" and a lavender on top cut to 3 3/4". After I added the white, I taped a piece of Offray 7/8" Sunburst Rainbow ribbon to the lavender piece and taped it with Scotch tape under the piece. Then I used adhesive to place it on top. I added the 3 scallop sentiment on top of it using dimensionals.

I am entering this card into the following challenges:

Getting Cricky with K Andrews - Argh Matey! Use a Pirate or Fish
Birthday Sundaes Challenge #46 - Birthday Card with Sentiment
For Your Inspiration Challenge #25 - inspired by the water and the round domes on the buildings

Sunday, March 4, 2012

Fabulous Shadowbox Card


I had a few moments to myself today and wanted to enter a few contests, so here is a cute idea I have been working on. I call it a shadowbox card because the frame is raised to make the card components look like they are inside a shadowbox. I used the sentiment, "Fabulous" because being told I am fabulous will ALWAYS make me smile!! Hope you like it!

Panda Hugs!
J-

Recipe

Card base

I cut a piece of purple Recollections card stock to 5" x 10" and scored at 5" to make the fold.

Frame 

I used a pretty paper from the SEI Crafts Couture pad and cut the frame shape from the Cricut Classic Font cartridge <Waytogo1> p. 72 on the italic function with shift selected. This gives you the entire frame in one cut. I cut on Real Dial Size at 5" to make sure it fit the card base perfectly.  I added all of the components first and then added 2 layers of square dimensionals to the back of the frame corners. I doubled them so the frame was raised even higher and then added it on top of the card base at the end.

Woman, shoe and sentiment 

Woman - Cricut Forever Young cartridge <Model6> p.29 cut at 3". I used the regular cut and the shift cut (twice to get the dress and purse in different colors). I added green Studio G glitter glue to the little purse.

Shoe - Cricut Forever Young cartridge <Heels1> p.54 cut at 3" on regular and shift cut. I only used 1 of the two that cut.

Sentiment - I cut the two bases for the sentiment from the same button as the woman, <model6> on the emblem function at 2" and 1 3/4".  The word fabulous is cut from <Flower7> on page 70 on the word function. Then, I added each base with pop dots in between and then added light blue Stickles to the word fabulous.

Finishing Touches

I added a tiny Recollections pearl to the dress and green Recollections crystal to the patterned strip for some bling - they come sticky so you don't need to add adhesive. For the shoe, I added a purple jewel from a set my son found in a crafting kit in the house and then layered a small green jewel on top of it for dimension. I added monoadhesive to the back of the jewel and it was perfect to stick on the high heel. Finally, I added 3 tiny pearls under the word fabulous....for emphasis!

I am entering this card into the following challenges:

Thursday, March 1, 2012

Thanks Coach


My son's rec basketball team made the final four for their league!! They won the first 2 playoff games and the championship game is on Saturday! They are playing the number one team in the league and it will be tough competition, but the boys are awesome and I am sure they will have a great game. The coaches for the team were great and to show our appreciation, my husband asked me to make a card for each of them. I made identical cards and they came out are just too cute!! I used my son's number on the little jersey and tried to make the character look like him.  The colors really stood out on the pretty green paper. Can't wait to give the cards to them after the game on Saturday.

Panda Hugs!
J-


Cartridges used:
Player and Hoop - Everyday Paper Dolls
Basketball - Best of 2008 
Sentiment - Printed from computer and punched with Recollections scallop punch
I am entering this card into the following challenge:

Monday, February 27, 2012

You're Boot-iful

Since I already posted today, this one is super quick. I am obsessed with my new SEI Couture stack paper!! This is my latest card.

Panda Hugs!
J-


Recipe

Card Base

1. Cut a piece of lavender Recollections card stock to 10" x 5" and scored at 5"
2. Cut a piece of dark purple Recollections card stock to 4" x 4" and ran it through the cuttlebug
3. Cut a strip of bright green paper to 1" x 5" and used blue Offray 1/8" ribbon (taped it behind the strip)
4. I added the green strip to the lavender base and then adhered the dark purple on top of it

Boots

I used the SEI Crafts Couture stack and the Cricut Create a Critter cartridge p. 31 <Duck> cut at 18" on the accessories function.  I tied a piece of white Offray 1/8" ribbon to each to look like laces.  Finally, I added bigger clear jewels across the top and Recollections green jewels down the toes

Sentiment

Used my computer and typed out "You're Boot-iful" - printed it on bright green card stock and then punched it out with my Recollections scallop punch. I cut two more scallop punches in lavender and yellow and added them together (staggered) with dimensionals. Finally, I cut off the bottom of the sentiment scallop so it lines up with the edge of the right boot.

I am entering this card into the following challenge:

Bitten by the Bug 2 - Nate's ABCs/Boots

Sunday, February 26, 2012

Springtime Shaker Card


 We had another fabulous weekend! My daughter has been sick for almost a week, so it was very nice to have her feeling better today.  We decided to take a drive with no destination and see where it took us. We ended up going from park to park where the kids were able to play for a little while at each playground. They had a great time and we enjoyed watching them have fun!  This morning, I was looking through some of my favorite blogs and saw a few challenges that caught my attention. I just bought some new paper stacks and was ready to try something new. Although I have done a shaker snowglobe, I really wanted to try a regular shaker card. So, today was the day I decided to do it. Also, I have been interested in the digital stamp option for a while, but never quite got to it. This morning I bought some Prismacolor pencils and downloaded my first few digital stamps.This card takes both digital stamping and the shaker card and blends them into (in my opinion) one of the best cards I have ever created! The recipe is a little complicated, but definitely worth it!

I uploaded a video to show you how the card looks when you shake the glitter!! Check it out here.

P.S. come back tomorrow for some amazing news I have to share!!

Panda Hugs!
J-

Recipe

Card base

1. Recollections lavender card stock - cut a piece of 12" x 12" card stock down to 12" x 6" and scored at 6" to make the card. I used my bone folder to get a nice crease.

2. Cut a piece of card stock from the S.E.I. Couture Pad to 5 1/2" x 5 1/2"

3. Added another piece of the same lavender card stock cut to 4 1/2" x 4 1/2" - before adhering it with monoadhesive, I added a piece of stretch lace ribbon and folded it around the back. I secured it with scotch tape in the back since you can't see it under the layer.

4. I topped off the card with a top layer cut to 4" x 4" from the DCWV Mariposa Matstack

Embellishments

Tilly on the Mushroom
The stamped image is from Digital Doodling. I was sad to see that she is no longer blogging, but she was kind enough to leave the blog up for the benefit of those looking for some pretty free digital stamps.  I printed her on white card stock, colored her with my new Prismacolor pencils and then used an exacto knife to cut the entire image out. I added a tiny Recollections pearl to her shirt and then pop dotted in the center of the green Mariposa cardstock.

Frame and Mushrooms
I cut the frame at 4 1/2" using <Frame1> from the Cricut Cindy Loo cartridge. I cut the base out in dark purple and the shift in yellow. I added Recollections pearls to the frame for a more elegant look. I also added two Recollections iridescent sparkly brads to the frame where the holes were cut out on both sides. I used the dimensionals to keep the end of the brad in place. The mushrooms are cut at 1 and 1 1/2" using <Mushroom> on p.63 of Cindy Loo. I cut the base in dark purple, the shift in a duskier purple, layer 1 in olive and layer 2 in yellow. Then I added purple Stickles to the spots on the mushrooms for a little sparkle.

Shaker Function
To create the shaker, I adhered both layers of the frame together, and then added a piece of transparency paper behind it. I use Elmers quick dry adhesive for it. That works much better for this type of gluing. For the transparency component, I used the clear paper that comes with the Cricut cutting mats. I save the paper when I throw away an old mat and then it can be used for future projects. Below is a picture of the frame with the transparency paper drying behind it.

After that was dry, I added another piece of 4 x 4 Mariposa paper to the back of it. Before adding it, I used an Exacto knife to cut out the center so you can still see through it. Then, I went around the entire frame using square dimensionals. Be careful to make sure they touch one another entirely, or you will have glitter leaking out all over the place! Below is a picture of the frame, the extra paper and the dimensionals.

Dimensional wall keeps the glitter from escaping
Once the top was done, I poured a little bit of Studio G yellow glitter on Tilly and the mushroom. and then added the frame piece over it.
Added the glitter right before I put the frame over Tilly
Sentiment and final touches
 I thought about leaving the sentiment off the card, but decided I could use something little. I used the silver Ink It Up Stamp Pad and used a tiny stamp that says "merci" to turn this into a thank you.  Finally, I added the little jewels to the top right at the end and then added the two Cindy Loo mushrooms to the bottom left for a finishing touch.


I am linking this post to the following link parties:

Tuesday, February 21, 2012

Fat Tuesday


When I decided to make make a card for every holiday, I had very little idea just how many holidays there actually are! That being said, it's Fat Tuesday (aka Mardi Gras). Fat Tuesday occurs on the day before Ash Wednesday and is named for the practice of eating heavier foods before the ritual fasting season called Lent. Instead of a card today, in keeping with Mardi Gras tradition, I decided to make a mask instead. I had a lot of fun making this and my daughter has already claimed it for show and tell tomorrow!

Panda Hugs!
J-

Recipe

I used the Me & My Big Ideas Bliss Matstack and cut out the mask on the green patterned paper at 11 1/2" using the <October> event button on the Cricut Designer's Calendar cartridge

Then, I cut two more of the same masks at 11 1/4" in purple and yellow

I removed the bottom of the second two masks, leaving only the decorative strips at the top

I used zig adhesive to attach the two decorative strips and placed them in a staggered manner so you can see all the colors from the front.  The image to the right shows the back of the mask and how the layered strips were attached.

Finally, I alternated tiny pearls and jewels to decorate the front of the mask and bent the feathery pieces in different directions to make them stand out more.

I am entering this into the following challenge:
Little Scrap Pieces - Use Green

Monday, February 20, 2012

Happy Birthday Mr. Presidents


It's President's Day....that means another card in the Year of Holiday Cards series. This one is simple but glittery...just like me! I used the Cricut Designer's Calendar cartridge for this one on the <April> button, but with the event feature activated. This gave me the silhouette for Washington and Lincoln. I used Recolections cardstock and cut out two circles and attached them to the circles to let the shapes stand out and then used some adhesive and glittered them up with blue Studio G glitter!

Panda Hugs!
J-

Thursday, February 9, 2012

Love Bites


I have two guilty pleasure in life. These are things that make me ALMOST as happy as spending time with my family (since nothing can top that!). The first is crafting, especially with my Cricut. Between my cricut, my paper trimmer, my new Cuttlebug and my Gypsy, I have truly turned crafting obsessed.

My second guilty pleasure is silly paranormal romance novels, the cheesier the better! As an English teacher, I encourage my students to read on a daily basis. I teach them fantastic classics, such as Romeo and Juliet, Of Mice and Men, To Kill a Mockingbird and more. When I get home, however, I just want to unwind. Sometimes that means reading as mindless a novel as I can get my hands on. In the classic tradition of cheesy paranormal romances, I can very much appreciate a good vampire, were creature or fairy story with the best of them.

With this in mind, I decided to make a Valentine's Day card for a good friend of mine. She is also an English teacher and we often bond over the latest novel in the next best vampire series. I thought I would take Valentine's day in a totally different direction and I think this card pays proper homage to vampires everywhere.


Recipe

Card base

1. DCWV La Creme Stack - cut a piece of 12" x 12" card stock down to 12" x 6" and scored at 6" to make the card. I used my bone folder to get a nice crease.

2. Cut a piece of Recollections pink card stock to 5 1/2" x 5 1/2" - Then, I ran it through my Cuttlebug with the swiss dots folder. The folder wasn't big enough so I did half and then lined it up and ran the other half through.

3. Added a piece of black card stock cut to 4 1/2" x 4 1/2" - before adhering it with monoadhesive, I added a piece of stretch lace ribbon and folded it around the back. I secured it with scotch tape in the back since you can't see it under the layer.

4. I topped off the card with a top layer cut to 4" x 4" from the DCWV Mariposa Matstack

Embellishments

The pink and red heart are from a new Recollections 1 Lb Assorted diecut bag I picked up on clearance for only $4.99 last weekend. I used a white Galaxy gel pen to add the stitching. These were adhered with one layer of pop dots.

The flying vampire heart is from the Cricut Rock Princess cartridge...love this one!!
The image is <Heart2> on p. 44 and was cut at 2". The shadow is black, the base cut is white, The shift is the dark pink,  layer 1 is red and layer 1 shift cut is light pink. I added my own hybrid sentiment by using a studio G stamp for the word LOVE on one wing and then using a stamping marker to write the word "Bites" in script on the other wing.

I am entering this card into the following challenges:

Wednesday, February 8, 2012

Happy Birthday Dear Trees...


Suprise, surprise, another holiday is here! I never realized how many holidays there are on the calendar until I started my card making adventure.

Today is Tu B’Shevat, the 15th of Shevat on the Jewish calendar.  This holiday is known as the “New Year for Trees." The literal significance of this holiday has to do with a seven year growing cycle and helps to determine in which year a tree is ready to be harvested for fruit. To celebrate, many people eat fruits that grow on trees, particularly in Israel, including grapes, figs, pomegranates, olives and dates. Many Hebrew schools hold what is referred to as a Tu B'Shevat seder, in which the children enjoy many different fruits.

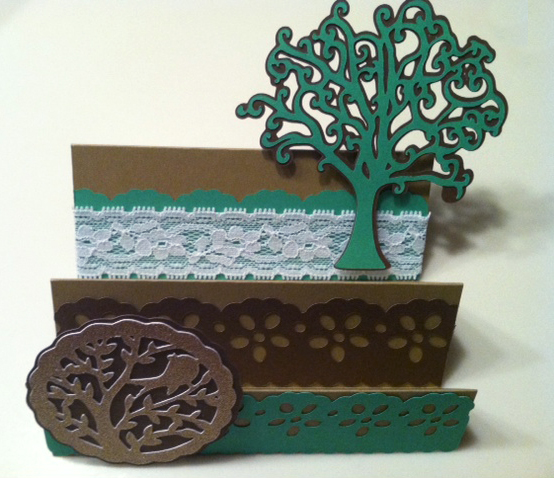
My holiday card adventure gave me a chance to take a break from making Valentines, so I thought I would try something creative. The card I made for Tu B'Shevat is simple, but I think it properly celebrates trees. It is my first stair step card, so I am still getting the hang of it, but my son loved it and that is all the encouragement I need to keep trying!

Recipe

Stair Step Card Base

1. Start with a piece of card stock cut to 5 1/2" X 10 1/2"

2. Score at 1 1/4", 2 1/2", 4 1/4", 6" and 8 1/4"

3. Fold up and down for alternating score lines (mountain/valley style)

4. Decorate each step

5. The the first step is 1 1/4" x 5 1/2" - I used green recollections card stock for the border. It is cut from the Cricut Holiday Cakes cartridge, pg. 51 <Baby3> at 1 1/4".

6. The second step is 1 3/4" x 5 1/2" - I used brown recollections card stock, the same cut for the border as step one, but this one was cut at 1 1/2". I used my paper trimmer to cut it to 5 1/2" in length.

7. The third step is 2 1/4" x 5 1/2" - I used green recollections card stock for the border. It is also cut from the Cricut Holiday Cakes cartridge, pg. 51 <Baby3>, but this one was cut on the plain base function at 1 1/2".  I trimmed this to 5 1/2" as well. Next, I added some LACE stretch ribbon on top of the border.

Scallop Doily

The embellishment for the first step is a doily from the Cricut Cindy Loo cartridge <Doily4> cut at 2 1/2".  The top is cut from DCWV Mariposa Matstack glitter paper and the shadow is cut from brown recollections card stock.

Tree

The tree for the third step is the <tree> image from the Cricut Best of 2010 cartridge cut on the regular button and the shift. I attached it using dimensionals so it stands out too.

I am entering my card into the following challenges:
FYI Challenge #23 - The levels of the church reminded me of the stair step card & they both have a religious component
Shopping our Stash Weekly Challenge 38: Hearts, Valentines and/or Lace

Saturday, February 4, 2012

A Joyful Gift of Love(bug)


Happy Saturday! I am having a wonderful day. This morning, my son's rec basketball team had a game. The other team was VERY aggressive. After being hit in the head with the basketball, my son was very frustrated. We had a talk about the fact that his team plays fairly and I told him that the best way to pay the other team back for bad behavior would be to win. 30 minutes later, his team won 22-16!

After we got home, my husband took the children to the Home Depot workshop to make heart boxes for Valentine's Day and I was able to get my lesson plans done.  My son and I worked on some fun crafty Valentine's for a while and then, my sister and brother-in-law and new baby niece came over and we got to spend some time together.  All in all, it was a great day!

One of the crafts we worked on was this adorable lovebug gift card holder. I used the recipe for a Joy Fold card and, instead of keeping the bottom flap open, I used adhesive on the right and left side to create a pouch for a gift card!


Gift card pouch on the inside
Recipe
Joy Fold Gift Card Holder
Base – 4 ¼ X 6 ¼
Score – 4 ¼

Smaller card – 3 X 6
Score - 3

The pink and white base card is from the My Mind's Eye Love Nest Stack by Carina Gardner and the red card on front is from the Mariposa Matstack by DCWV. I used a piece of pink Recollections cardstock for the layer on the inside and ran it through the Cuttlebug with the Swiss Dots folder.

Flying Heart, Ladybug & Lovebug sentiment

Both are cut at 2" from the Cricut Create a Critter cartridge on p. 66
<Ladybug1> standard cut and <heart> shift cut - I cut the regular cut, layer 1 and layer 2 for both
I used Recollections cardstock for the ladybug and the winged heart shadow. The wings match the My Mind's Eye Love Nest paper.


I am entering this card into the following challenges:
Cooking with Cricut - Challenge #71: Child's Valentine - Must use Pink, Red and White
card makin' mamas - Challenge #38: Valentine 
My Sheri Crafts Challenge #78: Love is in the Air 
Die Cuttin' Divas - Challenge #50: Anything Goes 

I am also linking to:
Sundays are Lovely #6 at Jaihart

Thursday, February 2, 2012

Happy Groundhog Day!


Happy Groundhog Day! Every time I blink, another holiday pops up, just like this little groundhog who is checking things out.  To be honest, with the 63 degree weather, this little guy probably came out early and was sunbathing on the beach in NJ yesterday!!

Last night, I was talking to my friend who inspired me to start my Year of Holiday Cards extravaganza, and we were having a hard time coming up with ways to celebrate Groundhog Day. I suggested that either she should repeat everything she says twice, or make shadow drawings. If you have any suggestions, leave me a comment and I will suggest them to her. I had a lot of fun with this card and with my new Cricut Designer's Calendar cartridge! I thought it would be perfect for my holiday-based endeavor and, immediately, it has come in handy.

Recipe
Card Base
Card is the <Milk> card from Just Because Cards cut at 5 1/2" from the
Martha Stewart Woodland Critters Stack
All of the layers are cut from Recollections cardstock
Yellow layer is cut to 4 1/2 X 4 1/2 and embossed with flowers on my Cuttlebug
Orange layer is cut to 4 X 4
Wood Grain strip on top is cut at 4 X 2 and is the flip side of the paper used for the base card

Groundhog with shadow
Brown groundhog is cut from Designer Calendar cartridge cut at 3 1/2"
White shadow is the same cut at 3 1/4"
The black hole is the <Skunk> cut from Create a Critter at 2"
I used a white gel pen to go over the contour marks on the groundhog to make them stand out more and used Stickles on the white shadow and the black hole for a glittery effect
I used two layers of dimensionals to attach him so he would stand out more than the sentiment

Sentiment
<March> Cut in brown and white, both at 1" from the Designer's Calendar cartridge
I layered the two colors on top of each other for a shadowed effect
Then, I added Stickles to the white layer to up the sparkle effect
I used one layer of dimensionals to make the sentiment pop!

I am entering this card into the following challenge:
Simon Says Stamp - Animal Antics

Monday, January 30, 2012

You Rock - Tiny Valentine


Today's post is super quick.  As happy as I am, sometimes cyberlife is a nice escape from the craziness that is real life.  I have been trying to get in as many Valentines as I can to make sure the kids have cards to give to everyone special in their lives. My daughter is a total diva (even at 6 years old), and I love to make super cute things for her. So, I saw a couple of challenges this week that inspired me to create this teeny tiny Valentine. Also, I just got my new Rock Princess cartridge and HAD to use it right away...I hope you like it!!

Side view to show the wing dimension
Recipe
All layers are Recollections cardstock

Card Base
I used the Gypsy with Cricut Just Because Cards - I took the second card on the cartridge and changed the dimensions to 6" width and 3" height to come up with a 3" X 3" card

I used the square on the Cricut Classic Font cartridge for the yellow layer and changed the dimensions to 2.25" X 2.25"
Sentiment
The "You" is cut from the Cricut Rock Princess Cartridge at .75" - It is the heart font on the cartridge
I welded it to create one solid word piece

Winged Heart
Cricut Rock Princess Cartridge - Regular cut, shift cut, layer 1, layer 1 shift and layer 2 all at 1.5"
I bent up the top layer of the wings to give it a more 3D look
Attached it to the card using dimensionals and then added Stickles to the wings and a few other areas for some extra shimmer

I am entering this card into the following challenges:

Sunday, January 29, 2012

My First Explosion Box

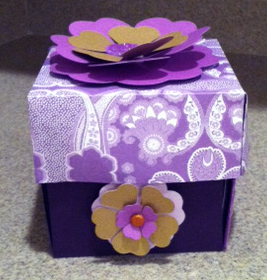
I am SO excited to share this special Valentine's Day project with you! This weekend, I was searching the web for new and exciting project ideas and came across a craft that immediately caught my attention. It's called an explosion box. Think pretty gift box meets awesome scrapbook or photo album and you have the idea. There are a good number of tutorials out there on how to create these adorable boxes, so I looked at a bunch and took the components I liked most to create mine. I added a bunch of pockets that I slipped little gift tags in to make it an extra special Valentine's gift.

I am VERY happy with the result, but the process was a little painful. The biggest problem I had was making the top of the box. The instructions I used said to cut the top at 8 X 8 and I thought I did that, but I actually cut it at 9X9 because I am still getting used to my paper cutter. Then, I redid it at 8X8 and the top was too small. Finally, just like Goldie Locks...3rd time was a charm...I split the difference and cut the third top at 8.5 X 8.5 and that finally did the trick!

I am not sure if you can see in the picture, but I also used my BRAND NEW CUTTLEBUG to emboss flowers on the top layer and to line the pockets on the middle layer!

It is very hard to "get" what an explosion box really is without seeing it in action, so I am adding my very first video here to show you! Explosion Box Demonstration

Recipe

Box
Bottom layer (outside of box) - 12" x 12"  - Score 4" in from all sides
Middle layer - 11" x 11"  - Score 3 3/4" in from all sides              
Top layer - 10" x 10" - Score 3 1/2" in from all sides

Cut out the corners from all three sheets so they look like this:

Lid:

Use a piece of cardstock cut to 8.5" X 8.5 "  Score 2" in from each side. Then, score the four corners on a diagonal as well. Fold each corner in and glue it to the side to create the lid. Use paper clips to keep the lid together while the glue dries. I didn't have any paperclips, so I used my daughter's hair clippies! Here is a pic of the first lid I made while it was drying (I did NOT end up using this one):
Final Lid

Embellishments:
I added fun details to the four side panels on all three layers. 
I created triangular pockets for tags using another technique I will feature in another blog post
 On the bottom layer, I used a pretty light pink ribbon with hot pink stitching
I added a beautiful flower from the Cricut Pagoda cartridge (Flower8 p. 57) on the top - I used dimensionals for a more 3D effect
I finished the top flower with Stickles in the middle for a Glitter Panda sparkle

Middle Archway Structure
I used the archway design from The Disney Princess cartridge to create the arch
Then, I flipped it and added a square in between the two and welded them together with the Gypsy
Once it was cut out, I folded up the two sides and that made the archway stand up!
I added the pagoda flowers using dimensionals and Recollections Brads for the middle


Thursday, January 26, 2012

G'Day Mate - Happy Australia Day


G'day Mate! Happy Australia day. If you just stumbled upon us here at Glitter Panda, you are so lucky! Today we have the second card in our new Year of Holiday Cards EXTRAVAGANZA!! Since I had never heard of Australia Day, you might be interested to know that it is the official national day of Australia.

To celebrate Australia Day, my friend bought Vegemite. In case you aren't a Vegemite expert, I did some research for you. According to the Kraft website, "VEGEMITE spread is a nutritious and versatile food. Proudly made in Australia, it’s one of the world’s richest known sources of Vitamin B." It is a concentrated yeast extract that Australians use on toast because "It’s far more tooth and gum friendly than jams or choc nut spreads, without compromising on taste." Who knew?!

Today, while my friend was eating Vegemite with her family, I was assembling this super cute Koala card in honor of the holiday. I actually cut ALL of the components out yesterday. They were so much easier to cut because I designed everything on my BRAND NEW GYPSY!!! I added the side view of the card because it is hard to see the dimension from the front. I used dimensionals to attach the black circle and then more to add the Koala. Her flower in her hair is also dimensional!! My daughter LOVED this card so I think she will give it to her teacher for Valentine's Day (although she did say she wanted to keep it for herself!).

Recipe

Koala
Koala - Cricut Create a Critter cartridge p.49 - cut at 2 1/2" ("Koala,"layer 1, layer 2)
Flower - "Koala" Accessory & Accessory shift - I added a little jewel in the middle for some bling
You can't see it from the picture, but the Koala's top layer is a shimmery white Recollections paper from their Precious Metals collection

Beary Sweet Sentiment
Beary - Gypsy font - I used my NEW Gypsy to weld the letters together
Sweet - Create a Critter cartridge p.61  - "Skunk" on Phrase feature
I added another jewel after the sentiment for an extra pop

Card Base
Cricut Just Because Cards cartridge - "Truck" cut at 5 1/2" using DCWV Bella Armoire
Red square and black circle were scraps I had from previous projects!

I am entering this card into the following challenges:

Thursday, January 19, 2012

Just Chillin' - Create a Critter Just Because


Just before bed this evening, my daughter reminded me that she needed an outfit for 80s day tomorrow.  Being the last minute diva that I am, I feel I rose to the challenge. I found a neon shirt that is just too small on her and quickly googled "make an 80s shirt."  Luckily, 2 videos popped up and I was able to follow the directions to create a very Flashdance looking creation. I grabbed an old pair of baseball socks from my son's drawer (he doesn't play anymore - basketball is his game now!).  I cut the toes off the socks and had the perfect pair of legwarmers. Add to that a pair of bright turquoise leggings and a white tank underneath and "she's a maniac, maniac on the floor!"
sorry for the blur, no pics of the kids online :)
The reason I didn't start on her outfit sooner was because I was at school somewhat late this afternoon. I am the yearbook adviser and we have deadlines to meet, so that means some late days at this time of year. Luckily, I love being a teacher.  Every day, there is a new challenge and every day is different. You never know what will happen.  One day, the kids are on the edge of their seats, ready to learn something new, and the next, they are pushing just a little harder to see what they can get away with.  A student said something in school today that I found so funny I actually laughed until I was crying!  A good attitude and a lot of heart makes every day an adventure.

Since midterms are coming up, it is very busy at school. It is hard for me to do my crafting any time other than the weekend. SO, when I get an hour to myself, I like to try to fit in a cute little card that I can enter into a challenge or two.  This card was inspired by the Cooking With Cricut Wednesday challenge this week. The little penguin is using his adorable scarf to keep himself warm. In my rush to get the card done, I went CRAZY with the glitter. In hindsight, I would have backed off the glitter on the igloo and the penguin and just used it to give the snow a glittery effect. I loved the phrase and after cutting it, I realized the blue color was VERY close to the color of the sky, so I glittered that up too, thinking it would stand out more. When I saw it was still too close, I cut my own little cloud and placed it behind the words. This served to give the card a little more dimension AND to make the words POP! I hope you enjoy this little guy!

Recipe
Penguin and Igloo (shift)- Create a Critter Cartridge p. 39
All components cut at 2"
The Penguin, Igloo, Layer 1, Layer 2, Igloo Shadow and Phrase (on regular and shift) were cut using Recollections card stock. I added black Studio G glitter (keep buying this from the $1 bin at my local craft store!) to the black part of the penguin and silvery blue glitter to the igloo. I used Zig to make zig zag glue strokes on the igloo and then added the glitter. Then I scraped it off to give the igloo a more icy look.

Card - Just Because Cards - Bird p.39
The Card base was cut on Real Dial Size at 6" using Martha Stewart's Woodland Critters pad. For the snow layer, I cut at 6" using the shift function with Real Dial Size turned off. Finally, I added iridescent Studio G glitter to make the snow shine and then attached it to the card using monoadhesive.  After the card was assembled, I added the Penguin using pop dots to give him more dimension. I also used pop dots for the Just Chillin' sentiment. Finally, I cut a cloud from white paper, added monoadhesive and slid it under the Just Chillin' sentiment.

I am entering this card into the following challenges/link parties:


Sunday, January 15, 2012

Family Snow Globe Shaker

 
Today was such a fantastic day. I am on a three day weekend from school, so I have more time to craft! The kids both have school projects that are due soon and we spent the day working on them. After checking out the Something Old, Something New, Something Borrowed, Something Blue blog hop over at Cooking with Cricut, I decided to use the idea as inspiration for my daughter's family snow globe project! It turned out to be a complete success!! I wish the picture was as cute as the final project in person, but I think you can get the idea. Please excuse the little black squares, I REALLY wanted to share the project, but I don't like to post pics of my kids on the internet.

I also removed our family name (I had my daughter write it in crayon to feature her fantastic Kindergarten writing skills!) It is in the middle of the frame on the bottom on the finished globe. I know the recipe is a little complicated, but the final project is so much fun that I hope you'll think it's worth it!

(Complicated) Recipe
Snowglobe:
Base - Cricut Doodlecharms cartridge - 10" - on blackout - blue paper
Top of globe - shift cut on blackout - 10" - white paper
Clear snow globe effect - shift cut on blackout - 10" - acetate patterned paper from K & Company Cara Marie pad
Gold border (used to hide the dimensionals creating the barrier for snow/glitter - same as top of snowglobe - shift cut on blackout - 10" - then cut again at 8 1/2" using center point feature OR use the Gypsy to place one inside the other and cut
Snow on bottom - cotton balls
Sky background - My daughter's artwork!
Snow/shimmer - Studio G iridescent glitter

Used Elmer's craft bond (needed liquid glue) to attach acetate to gold border
Used Square dimensionals to create a border around the entire white globe top to make sure the glitter wouldn't escape - do NOT remove paper from dimensionals until AFTER glitter is poured in

People:
Bodies - Cricut Everyday Paper Dolls Cartridge basic doll image - 2 1/2 for kids & 2 3/4 for adults
Clothing - Girls  - WintrG & WintrB on pg. 36 & 37

Frame for our family name on the front:
Cricut Sentimentals cartridge - Frame2 - white paper - 4 1/2"
Gold overlay - Frame2 - shift cut - gold shimmer paper (Recollections)

I am entering this project into the following challenges:
Little Scrap Pieces - Anything Goes Challenge 
The Cuttlebug Spot - Winter Time Challenge - texture = cotton balls used for snow


Tuesday, November 8, 2011

Love you a Latte Card - Just Because

I made sure to vote on my way home from school today. It was very late, but I think every vote counts! When I got home, I had a wonderful treat waiting for me! The Just Because Cards cartridge was sitting on the counter, all wrapped up in the shipping packaging, just begging to be opened!!

There were two challenges I have been thinking about since the weekend and, after I put bunny to bed, I had a few moments of free time to craft! I told someone today that crafting is my therapy. I am able to focus on my creativity, not because someone NEEDS me to, but because I WANT to! So, I treated myself to a therapy session courtesy of Just Because cards and this is what I came up with. The two challenges are the Getting Cricky Simply Sunday Tea Time Challenge and the PDCC106 based on the colors pink, yellow and gray. The result was a gray, pink and yellow card featuring, my hot beverage of choice, a latte!

I combined the "Love you a Latte" sentiment (#11) with the Milk card (#9) base in yellow. I cut the envelope first on the fit to page button (4 1/4").  The houndstooth print envelope is cut from a BEAUTIFUL 12x12 pad I have from DCWV called Bella Armoire. I cut the card at 4" to make sure it would fit nicely into the envelope. The shift for the card is the strip of houndstooth paper that matches the envelope.

The sentiment was too small at 4" so I recut it at 5" out of the pink paper and then cut the shift with silver paper (both from the Recollections packages). The teacup and teacup steam (teacup layer) were both from Once Upon a Princess and were cut at 1". I attached the teacup using dimensionals to give it a pop and then applied a TINY bit of Star Dust Stickles to give the coffee mug a shimmery finish.


Saturday, November 5, 2011

Posh Pancakes, Pajamas and Purses Party

Purse cut at 1 1/2" - Lipstick & Polish at 2 3/4" - Posh at 1"

It's been a long time between posts and although I was sad not to blog, I have been VERY busy with life in general. Lots of grading and family time activities. BUT...I was working on a fantastic project that I am excited to share. My bunny (daughter) is turning 6 and it is time to celebrate!  In true Glitter Panda fashion, I decided to use my Cricut to come up with fabulous invites for the super fun party theme we came up with. Bunny's party is going to be a Posh Pajamas, Pancakes and Purses Party. It will be a pretend sleepover featuring breakfast for dinner (one of Bunny's favorites), nail polish for all the girls, a movie with popcorn, and S'mores!

Since the party will be a smaller gathering, I decided I could make all of the invites myself using my Cricut. I chose the Wild Card cartridge and bravely attempted the Pinwheel card!!  The nail polish, lipstick, purse and the word posh on the card all came from the Forever Young cartridge.

I used my favorite Recollections card stock (Butterfly Wings package) for the cards, the round turning circle and the base of the lipstick. The envelopes were all made using a 12X12 pad from Me and My Big Ideas. The style is called Bliss. The brads I used to connect the wheel to the card are Recollections as well, and I found them in the clearance bin at my local craft store. Some are flat, and some are super glittery!! Finally, I added Cotton Candy Stickles to the word "posh" and to the lipstick for a little bling!!

By trial and error, I have learned that cutting the card 1/4" smaller than the envelope ensures a better fit for the card. So, the card was cut at 6 1/4" and the envelopes were cut at 6 1/2" (both on the blackout feature).  The cupcake with the actual invite info was created by running the card stock through my laser printer. Then, I used the center point function on the Cricut to cut around the words in the shape of the cupcake. Pop Up Glue Dots gave the dimension to the cupcake on the inside (and the purse, lipstick and polish on the outside). See below for sizes and more pics!

Unique Envelopes cut at 6 1/2" on Blackout feature - 12X12 Me and My Big Ideas "Bliss" Pad
Cupcake created with Celebrations cartridge - cut at 5 3/4" using Center Point