Tweet About Me

Follow Me on Pinterest

Monday, January 30, 2012

You Rock - Tiny Valentine


Today's post is super quick.  As happy as I am, sometimes cyberlife is a nice escape from the craziness that is real life.  I have been trying to get in as many Valentines as I can to make sure the kids have cards to give to everyone special in their lives. My daughter is a total diva (even at 6 years old), and I love to make super cute things for her. So, I saw a couple of challenges this week that inspired me to create this teeny tiny Valentine. Also, I just got my new Rock Princess cartridge and HAD to use it right away...I hope you like it!!

Side view to show the wing dimension
Recipe
All layers are Recollections cardstock

Card Base
I used the Gypsy with Cricut Just Because Cards - I took the second card on the cartridge and changed the dimensions to 6" width and 3" height to come up with a 3" X 3" card

I used the square on the Cricut Classic Font cartridge for the yellow layer and changed the dimensions to 2.25" X 2.25"
Sentiment
The "You" is cut from the Cricut Rock Princess Cartridge at .75" - It is the heart font on the cartridge
I welded it to create one solid word piece

Winged Heart
Cricut Rock Princess Cartridge - Regular cut, shift cut, layer 1, layer 1 shift and layer 2 all at 1.5"
I bent up the top layer of the wings to give it a more 3D look
Attached it to the card using dimensionals and then added Stickles to the wings and a few other areas for some extra shimmer

I am entering this card into the following challenges:

Sunday, January 29, 2012

My First Explosion Box

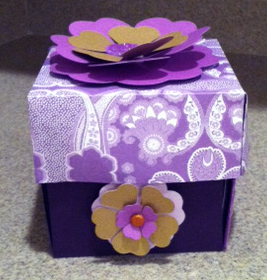
I am SO excited to share this special Valentine's Day project with you! This weekend, I was searching the web for new and exciting project ideas and came across a craft that immediately caught my attention. It's called an explosion box. Think pretty gift box meets awesome scrapbook or photo album and you have the idea. There are a good number of tutorials out there on how to create these adorable boxes, so I looked at a bunch and took the components I liked most to create mine. I added a bunch of pockets that I slipped little gift tags in to make it an extra special Valentine's gift.

I am VERY happy with the result, but the process was a little painful. The biggest problem I had was making the top of the box. The instructions I used said to cut the top at 8 X 8 and I thought I did that, but I actually cut it at 9X9 because I am still getting used to my paper cutter. Then, I redid it at 8X8 and the top was too small. Finally, just like Goldie Locks...3rd time was a charm...I split the difference and cut the third top at 8.5 X 8.5 and that finally did the trick!

I am not sure if you can see in the picture, but I also used my BRAND NEW CUTTLEBUG to emboss flowers on the top layer and to line the pockets on the middle layer!

It is very hard to "get" what an explosion box really is without seeing it in action, so I am adding my very first video here to show you! Explosion Box Demonstration

Recipe

Box
Bottom layer (outside of box) - 12" x 12"  - Score 4" in from all sides
Middle layer - 11" x 11"  - Score 3 3/4" in from all sides              
Top layer - 10" x 10" - Score 3 1/2" in from all sides

Cut out the corners from all three sheets so they look like this:

Lid:

Use a piece of cardstock cut to 8.5" X 8.5 "  Score 2" in from each side. Then, score the four corners on a diagonal as well. Fold each corner in and glue it to the side to create the lid. Use paper clips to keep the lid together while the glue dries. I didn't have any paperclips, so I used my daughter's hair clippies! Here is a pic of the first lid I made while it was drying (I did NOT end up using this one):
Final Lid

Embellishments:
I added fun details to the four side panels on all three layers. 
I created triangular pockets for tags using another technique I will feature in another blog post
 On the bottom layer, I used a pretty light pink ribbon with hot pink stitching
I added a beautiful flower from the Cricut Pagoda cartridge (Flower8 p. 57) on the top - I used dimensionals for a more 3D effect
I finished the top flower with Stickles in the middle for a Glitter Panda sparkle

Middle Archway Structure
I used the archway design from The Disney Princess cartridge to create the arch
Then, I flipped it and added a square in between the two and welded them together with the Gypsy
Once it was cut out, I folded up the two sides and that made the archway stand up!
I added the pagoda flowers using dimensionals and Recollections Brads for the middle


Thursday, January 26, 2012

G'Day Mate - Happy Australia Day


G'day Mate! Happy Australia day. If you just stumbled upon us here at Glitter Panda, you are so lucky! Today we have the second card in our new Year of Holiday Cards EXTRAVAGANZA!! Since I had never heard of Australia Day, you might be interested to know that it is the official national day of Australia.

To celebrate Australia Day, my friend bought Vegemite. In case you aren't a Vegemite expert, I did some research for you. According to the Kraft website, "VEGEMITE spread is a nutritious and versatile food. Proudly made in Australia, it’s one of the world’s richest known sources of Vitamin B." It is a concentrated yeast extract that Australians use on toast because "It’s far more tooth and gum friendly than jams or choc nut spreads, without compromising on taste." Who knew?!

Today, while my friend was eating Vegemite with her family, I was assembling this super cute Koala card in honor of the holiday. I actually cut ALL of the components out yesterday. They were so much easier to cut because I designed everything on my BRAND NEW GYPSY!!! I added the side view of the card because it is hard to see the dimension from the front. I used dimensionals to attach the black circle and then more to add the Koala. Her flower in her hair is also dimensional!! My daughter LOVED this card so I think she will give it to her teacher for Valentine's Day (although she did say she wanted to keep it for herself!).

Recipe

Koala
Koala - Cricut Create a Critter cartridge p.49 - cut at 2 1/2" ("Koala,"layer 1, layer 2)
Flower - "Koala" Accessory & Accessory shift - I added a little jewel in the middle for some bling
You can't see it from the picture, but the Koala's top layer is a shimmery white Recollections paper from their Precious Metals collection

Beary Sweet Sentiment
Beary - Gypsy font - I used my NEW Gypsy to weld the letters together
Sweet - Create a Critter cartridge p.61  - "Skunk" on Phrase feature
I added another jewel after the sentiment for an extra pop

Card Base
Cricut Just Because Cards cartridge - "Truck" cut at 5 1/2" using DCWV Bella Armoire
Red square and black circle were scraps I had from previous projects!

I am entering this card into the following challenges:

Wednesday, January 25, 2012

A Year of Holiday Cards - Chinese New Year


A good friend of mine made a unique New Year's resolution. She decided to celebrate every holiday on the calendar for an entire year! To kick off her year of celebrations, last weekend she invited our family, together with another friend's family, to celebrate the Chinese New Year with her. With such great company, the night was already sure to be wonderful...and it was! After a fantastic meal of homemade Chinese food, the children lit sparklers and popped those little poppy things (I have no idea what they are called!)  We all had such a great time!!

After the dinner, I found myself inspired to put my own spin on her idea. So, I have decided to create a card inspired by the holidays that she celebrates this year. By the end of the year,  I will have created a cultural cornucopia of cards!!

I hope that I will soon be able to start a challenge on my blog where others can join with me to create the holiday cards as well. It will be a celebration across the web that embraces many cultures and traditions.

The card I have featured today was created to celebrate the Chinese New Year - the year of the Dragon.

Recipe

Dragon and flower6: Cricut Pagoda cartridge (p. 34 & 55) - Recollections card stock
The dragon is attached with one layer of dimensionals. I used a white gel pen to add a little eye.
The flower is assembled using dimensionals between each layer (black, red, white) and then a jewel is glued to the middle of the flower. The white swirls on the red part of the flower were created with a white gel pen to mimic the design on the actual base card

Sentiment: Cricut Wild Card cartridge - Recollections card stock

Card Base - Cricut Just Because Cards cartridge - "Truck" cut at 5 1/2" using DCWV Bella Armoire

I am entering this card into the following challenges:
Link Up Love Party With K Andrew


Since I am new to the world of crafting AND blogging, one of the best ways to connect to others is through challenges, blog hops and link up parties. This Link Up Love Party with K Andrew is the perfect way to get to know each other and find new blog inspiration. I am so happy that this Link Up is Valentine's themed, because I just finished my adorable Valentine's card and am so excited to share it. To get the recipe for this card, check out my previous post! Also, please check out the other fantastic submissions on the Getting Cricky with K Andrews Blog.  Then, join in the fun by linking up your project too!


Tuesday, January 24, 2012

These Little Piggies...


We were so busy all weekend that we didn't have a minute to stop.  My son had a basketball tournament and I must say he played EXCEPTIONALLY well.  I was such a proud mom!!  Now that the weekend is over, it's back to school and midterms start at the end of this week.  With all of the grading on the horizon, I am sure I will not get a lot of good quality crafting time, so I took a little while this evening to get into the upcoming holiday spirit. Love is in the air. Valentine's Day is fast approaching and I wanted to create a card to celebrate! I LOVE "punny" cards and this sentiment was perfect for a mother/child Valentine. I hope you like it as much as I do :) I went into my stash this week and found the fabulous Sweet Stack from DCWV. I have had it for quite some time and realized it was perfect for Valentine's colors and designs!! I also pulled out my Stickles for the first time in a while.  I have been working with loose glitter and thought it would be nice to go back to the Stickles for a change.

Recipe

Card base
Just Because Cards cartridge "Flower2" p.52 cut at 6"
Card stock is DCWV- The Sweet Stack

Little Piggies
Create a critter cartridge "Pig" p.28 - Mommy cut at 2 1/2" and child at 2"
All of the card stock is by Recollections - the base was cut from black, lighter pink for layer 1, darker pink for layer 2 and lighter pink for layer 3 (snout)
I used Stickles on the little snouts and the skirts for a little touch of bling
The piggies are attached using dimensionals to give the card more interest

Hogs and Kisses Sentiment
Just Because Cards cartridge "Pig" p.70 cut on the Word feature

I am entering this card into the following challenges:

Thursday, January 19, 2012

Just Chillin' - Create a Critter Just Because


Just before bed this evening, my daughter reminded me that she needed an outfit for 80s day tomorrow.  Being the last minute diva that I am, I feel I rose to the challenge. I found a neon shirt that is just too small on her and quickly googled "make an 80s shirt."  Luckily, 2 videos popped up and I was able to follow the directions to create a very Flashdance looking creation. I grabbed an old pair of baseball socks from my son's drawer (he doesn't play anymore - basketball is his game now!).  I cut the toes off the socks and had the perfect pair of legwarmers. Add to that a pair of bright turquoise leggings and a white tank underneath and "she's a maniac, maniac on the floor!"
sorry for the blur, no pics of the kids online :)
The reason I didn't start on her outfit sooner was because I was at school somewhat late this afternoon. I am the yearbook adviser and we have deadlines to meet, so that means some late days at this time of year. Luckily, I love being a teacher.  Every day, there is a new challenge and every day is different. You never know what will happen.  One day, the kids are on the edge of their seats, ready to learn something new, and the next, they are pushing just a little harder to see what they can get away with.  A student said something in school today that I found so funny I actually laughed until I was crying!  A good attitude and a lot of heart makes every day an adventure.

Since midterms are coming up, it is very busy at school. It is hard for me to do my crafting any time other than the weekend. SO, when I get an hour to myself, I like to try to fit in a cute little card that I can enter into a challenge or two.  This card was inspired by the Cooking With Cricut Wednesday challenge this week. The little penguin is using his adorable scarf to keep himself warm. In my rush to get the card done, I went CRAZY with the glitter. In hindsight, I would have backed off the glitter on the igloo and the penguin and just used it to give the snow a glittery effect. I loved the phrase and after cutting it, I realized the blue color was VERY close to the color of the sky, so I glittered that up too, thinking it would stand out more. When I saw it was still too close, I cut my own little cloud and placed it behind the words. This served to give the card a little more dimension AND to make the words POP! I hope you enjoy this little guy!

Recipe
Penguin and Igloo (shift)- Create a Critter Cartridge p. 39
All components cut at 2"
The Penguin, Igloo, Layer 1, Layer 2, Igloo Shadow and Phrase (on regular and shift) were cut using Recollections card stock. I added black Studio G glitter (keep buying this from the $1 bin at my local craft store!) to the black part of the penguin and silvery blue glitter to the igloo. I used Zig to make zig zag glue strokes on the igloo and then added the glitter. Then I scraped it off to give the igloo a more icy look.

Card - Just Because Cards - Bird p.39
The Card base was cut on Real Dial Size at 6" using Martha Stewart's Woodland Critters pad. For the snow layer, I cut at 6" using the shift function with Real Dial Size turned off. Finally, I added iridescent Studio G glitter to make the snow shine and then attached it to the card using monoadhesive.  After the card was assembled, I added the Penguin using pop dots to give him more dimension. I also used pop dots for the Just Chillin' sentiment. Finally, I cut a cloud from white paper, added monoadhesive and slid it under the Just Chillin' sentiment.

I am entering this card into the following challenges/link parties: